Oh, Taco Tuesday! Is there anything better than that mid-week call for tacos? I swear, my family starts asking about it by Monday afternoon. But this year, we’re kicking our usual routine up a notch with some seriously awesome Restaurant-Style Taco Tuesday Recipes at Home (2025). Forget the takeout menu for a night, because I’ve got a recipe that’s pure magic: Burnt Cheese Tacos! Seriously, the idea of that super crispy, golden-brown cheese shell, practically caramelized right onto a soft tortilla? It’s a game-changer. And that creamy, smoky chipotle sauce? Heaven! I first tried making something like this totally on a whim, trying to get that little bit of crispy, browned cheese you sometimes find at the bottom of a quesadilla, and wow, did it ever work!
Why You’ll Love These Restaurant-Style Taco Tuesday Recipes at Home
Seriously, get ready to fall in love with Taco Tuesday all over again. This recipe is a total winner because:
- It’s ridiculously fast! We’re talking minutes, not hours, for an amazing dinner.
- Super simple ingredients you probably already have in your kitchen.
- That crispy, “burnt” cheese shell? It’s a flavor explosion you can’t get anywhere else.
- The smoky chipotle sauce is addictive – you’ll want to put it on everything!
- It’s a total crowd-pleaser, perfect for family nights or entertaining friends.
- It truly elevates your home taco game to restaurant-quality.
Gather Your Ingredients for Restaurant-Style Taco Tuesday Recipes at Home
Okay, prepping for these amazing burnt cheese tacos is super easy! You’ll need just a few things to get that restaurant-style magic happening right in your own kitchen. Honestly, the ingredient list is pretty straightforward, which makes it even better for a quick weeknight dinner. Trust me, having everything ready to go makes the whole cooking process a breeze. We’ll separate them out for the sauce and the tacos, just so it’s super clear!
For the Zesty Chipotle Dipping Sauce
This is where the magic starts! You just need a few common things to whip up this creamy, spicy sauce:
- 1/2 cup mayonnaise
- 2 tablespoons canned chipotle in adobo sauce (go for more if you like it extra spicy, just taste as you go!)
- 1 tablespoon fresh lime juice (a little zing cuts through the richness!)
- 1/2 teaspoon kosher salt (again, taste and adjust – salt is key!)
For the Amazing Burnt Cheese Tacos
This is the fun part, where we bring it all together for those incredible crispy tacos:
- Nonstick cooking spray (just a little spritz to help things along)
- 3 1/2 cups shredded Mexican cheese (divided – this is crucial for getting that perfect crispy shell!)
- 6 corn or fajita-style flour tortillas (I like the 6-inch size best for these)
Step-by-Step Guide to Making Burnt Cheese Tacos
Alright, let’s get cooking! This is where the magic really happens, and trust me, it’s easier than you think. Don’t be intimidated by the “burnt” part – it’s actually that perfectly browned, crispy cheese that makes these tacos so special. Just follow along, and you’ll have restaurant-quality tacos on your table in no time. It’s almost as satisfying as making a perfect batch of crispy oven fries!
Preparing the Zesty Chipotle Dipping Sauce
First things first, let’s get that sauce going! In a little bowl, just dump in your mayo, a couple of tablespoons of that smoky chipotle in adobo sauce (add more if you’re feeling brave!), a squeeze of fresh lime juice for brightness, and a pinch of kosher salt. Give it a good whisk until it’s all smooth and creamy. Taste it! Does it need more heat? More salt? You’re the boss here, adjust it to your liking. Pop it in the fridge while we make the tacos.
Crafting the Perfect Burnt Cheese Shells
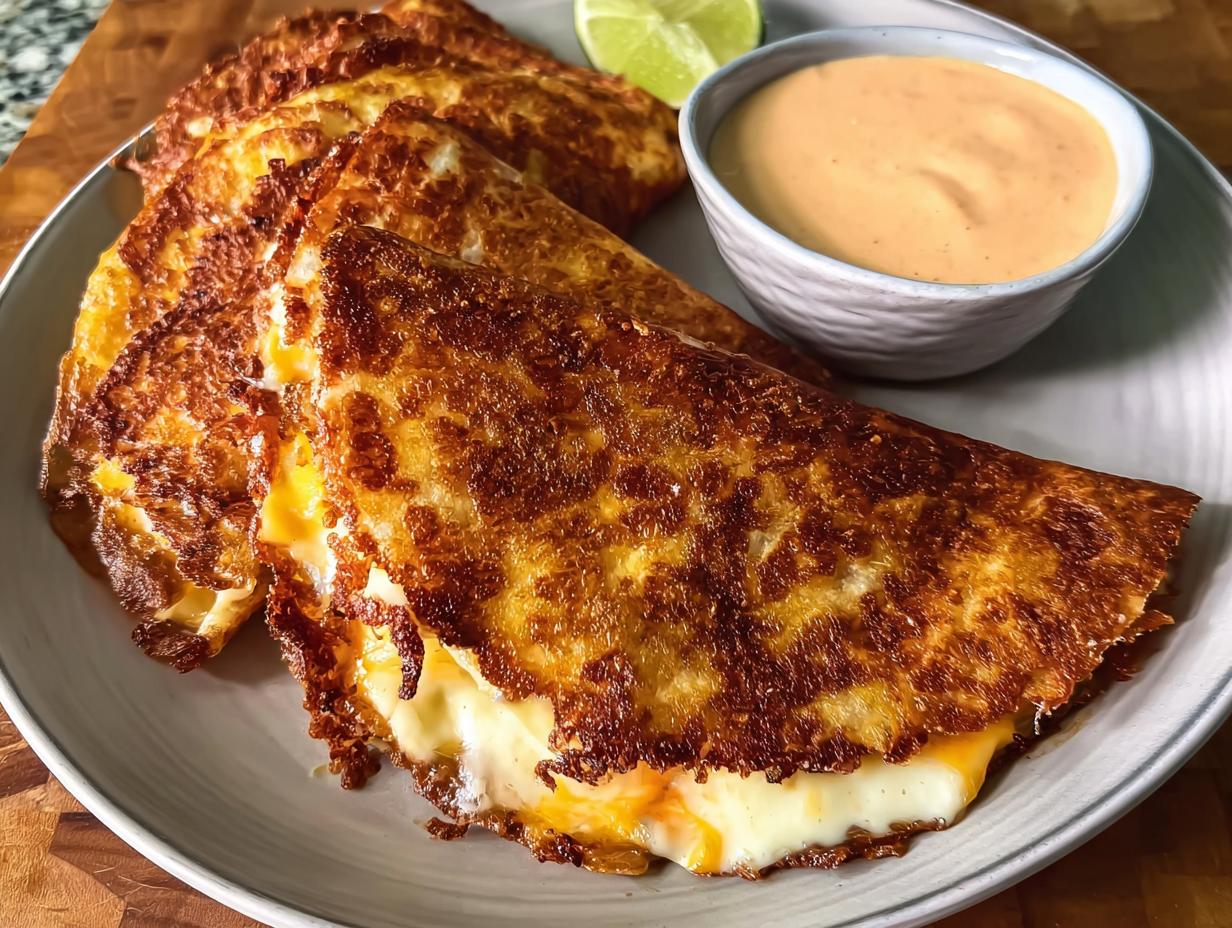
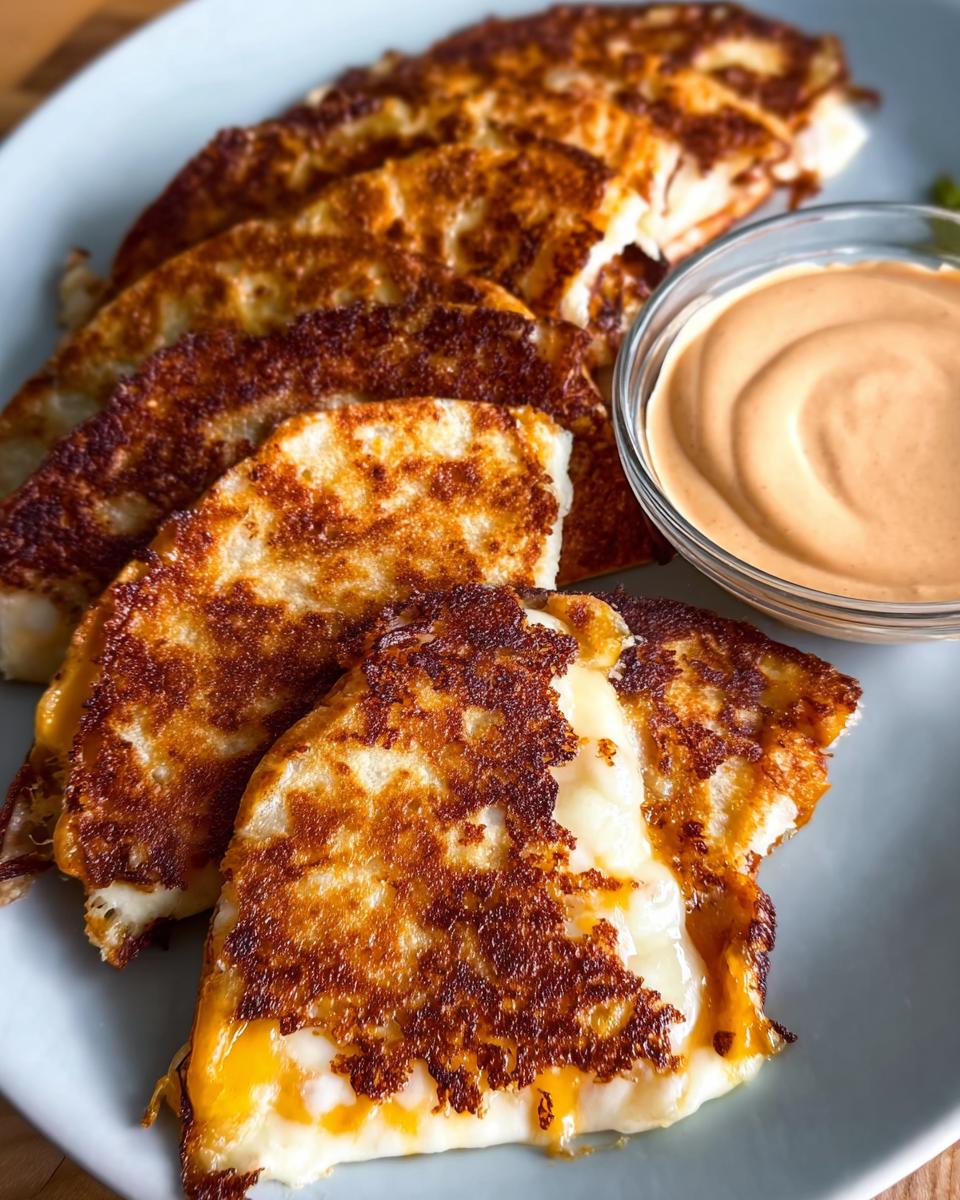
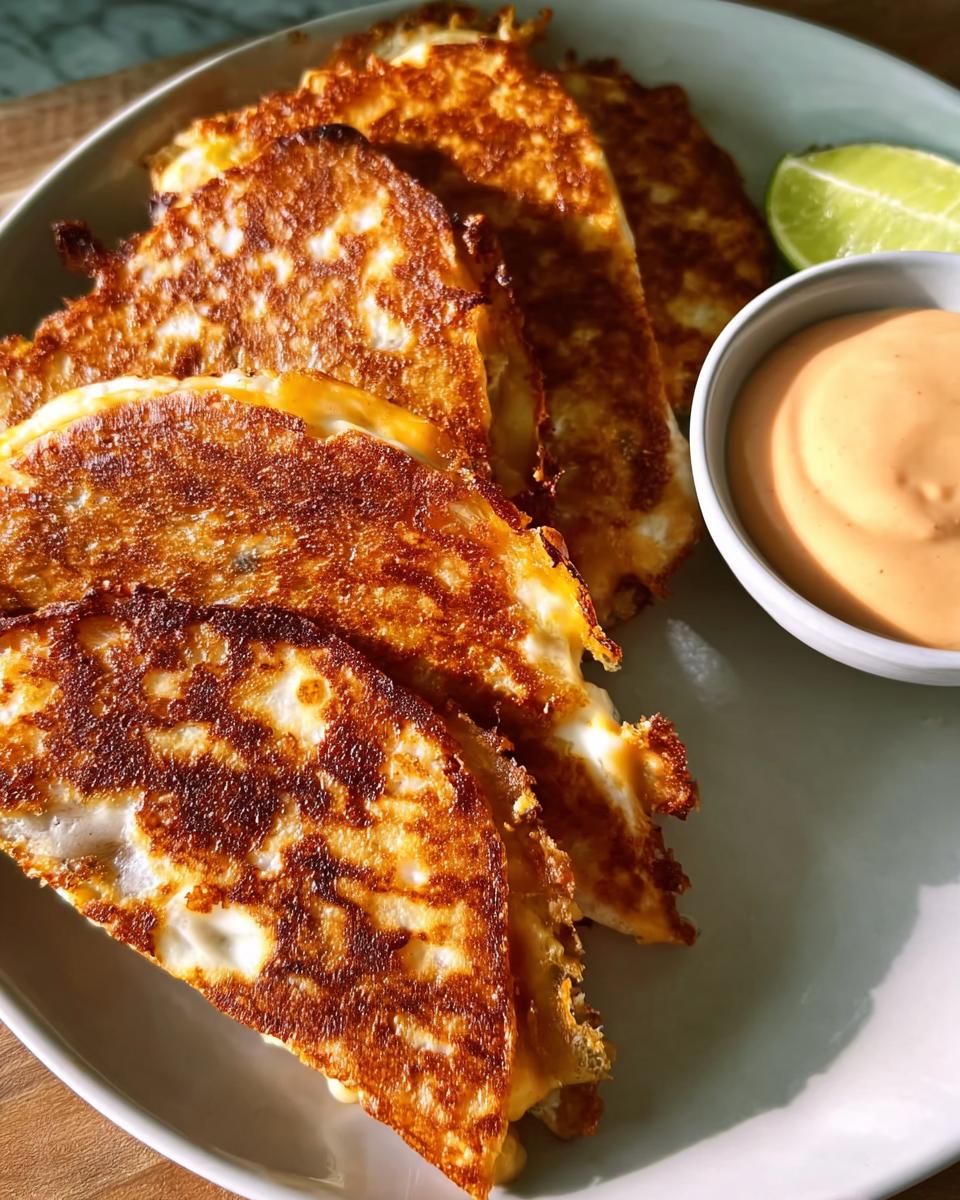
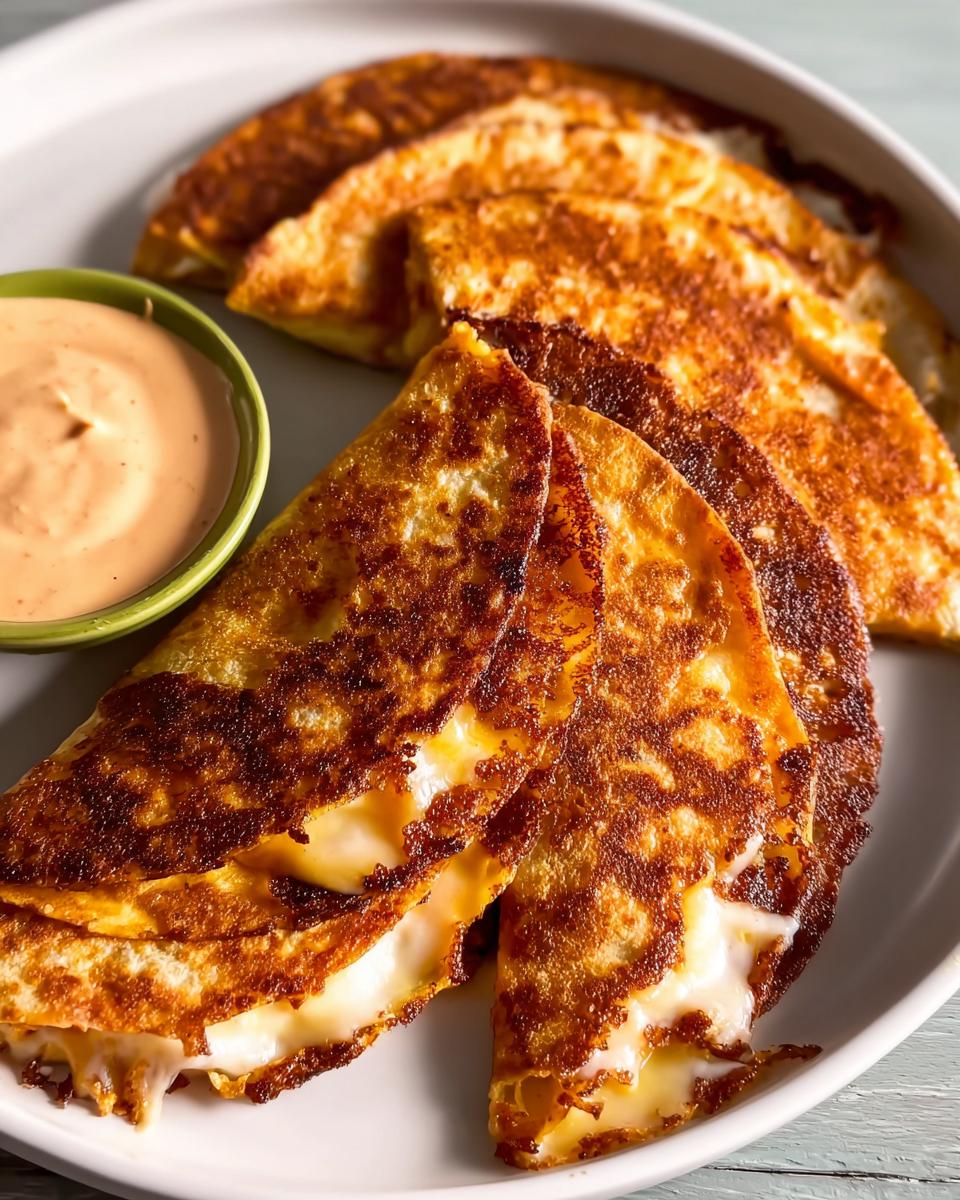
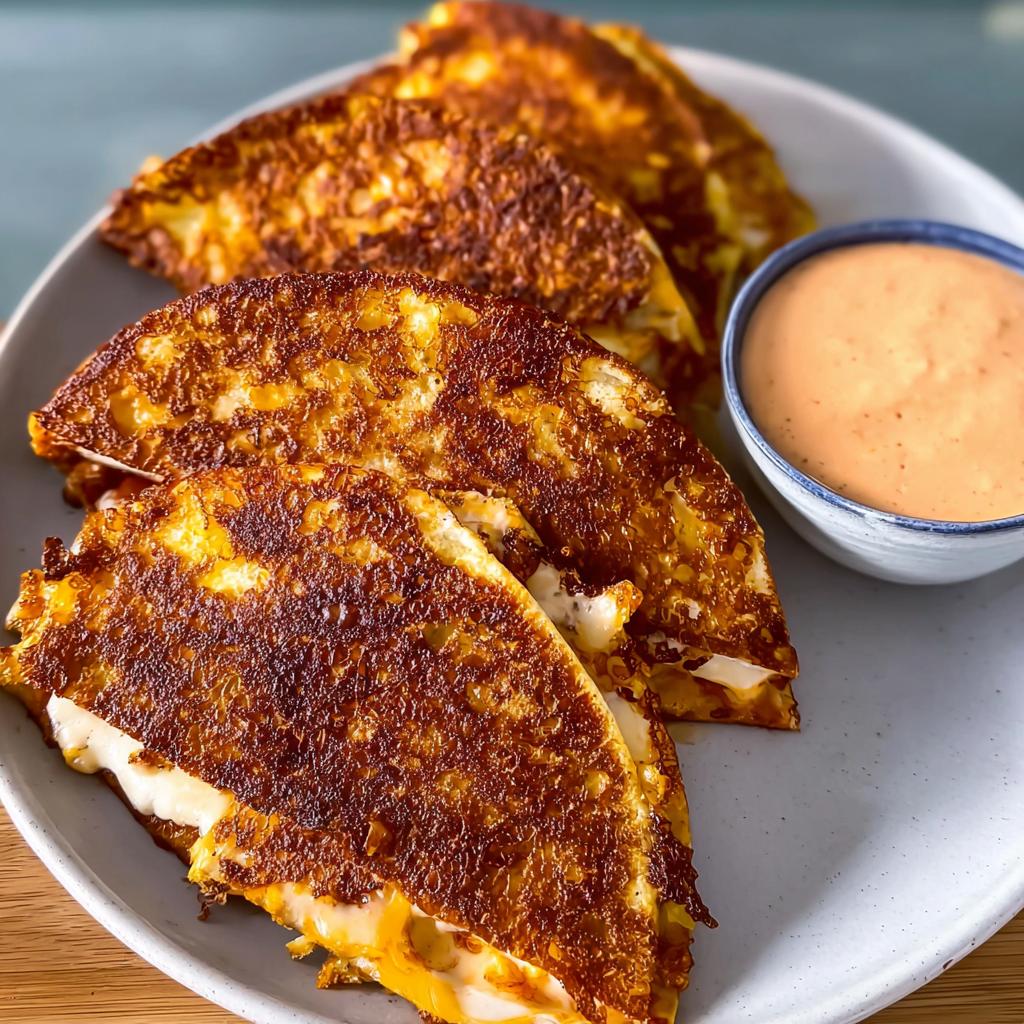
Now for the star of the show! Grab your biggest nonstick skillet and crank up the heat to medium. Give it a quick spritz of cooking spray. Once it’s nice and hot, sprinkle about a third of a cup of your shredded Mexican cheese right into the pan, making a circle about 6 inches wide. Don’t worry if it’s not a perfect disc; little gaps are totally fine, just keep that circle roughly together. Now, carefully lay one of your tortillas right on top of that cheesy circle. You should see some cheese peeking out around the edges, which is exactly what we want! Sprinkle another quarter cup of cheese over just half of the tortilla. Let it cook for about 2 minutes. You’ll see the cheese touching the pan start to get golden brown and crispy around the edges. This is the key!
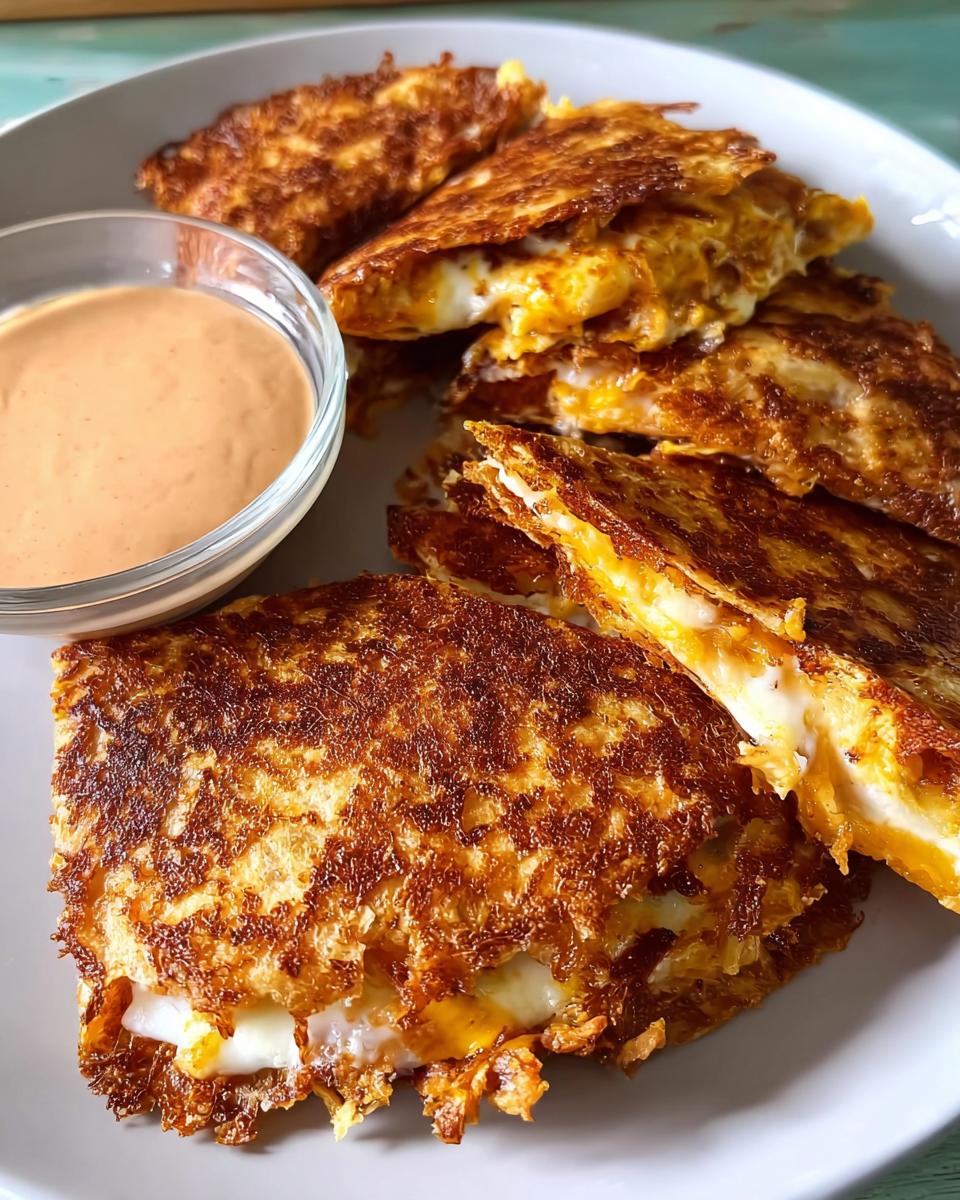
As soon as those edges look good and browned, use your rubber spatula to gently lift the whole thing – cheese and tortilla. Quickly fold the plain half of the tortilla over the cheesy half, like closing a book. Press it down gently with your spatula to help it stick together. Keep cooking for another couple of minutes until the middle is all melty and that crispy cheese shell is a beautiful, deep golden brown on both sides. Make sure you check out this awesome recipe for more ideas on getting that perfect char!
Assembling and Serving Your Tacos
Once those amazing burnt cheese shells are done, slide them right onto a plate! Repeat the process with the remaining cheese and tortillas. These beauties are best served IMMEDIATELY while they’re still super crispy and gooey. Grab that chipotle sauce, plunge right in, and enjoy the crunch!
Tips for Restaurant-Quality Tacos at Home
Okay, so you’ve got the basic idea, but let me give you a few little secrets to make these tacos truly sing and get that restaurant-quality wow factor at home! First off, don’t be afraid of the cheese color. We’re going for “golden brown” here, not “blackened charcoal,” but a good deep color means maximum flavor! Make sure your skillet heat is just right – medium is usually perfect. Too hot and the cheese burns before the tortilla warms up; too low and it just gets greasy.
Also, the type of cheese really matters. While a Mexican blend is great, sometimes mixing in a bit of sharp cheddar or Monterey Jack can add extra depth. And for that extra crispy edge, sometimes letting the cheese circle cook for just a few extra seconds *before* you lay the tortilla on top can help get that initial crisp going. It’s all about that perfect balance, just like with a killer vegetarian stir-fry – you want all the elements to work together! Trust me, a little practice and you’ll be a burnt cheese taco master!
Ingredient Notes and Substitutions for Your Taco Night
Alright, let’s chat about these ingredients for your Restaurant-Style Taco Tuesday Recipes at Home (2025)! The beauty of this recipe is its flexibility, so don’t stress if you don’t have *exactly* what’s listed. For the chipotle sauce, if you’re not a fan of mayo or want something a little lighter, plain Greek yogurt or even sour cream can work in a pinch. Just whisk it up with the chipotle peppers, lime, and salt. And for the cheese, while a Mexican blend is awesome, feel free to mix in some sharp cheddar for extra tang, or even pepper jack for more heat! If you’re making a chicken wrap and want to add some heat, just chop up one of those chipotle peppers even finer. If it’s too spicy, add a touch more mayo or yogurt. It’s all about making it perfect for YOU!
Frequently Asked Questions About Burnt Cheese Tacos
Got burning questions about these amazing burnt cheese tacos? I get it! This recipe is a little different, and we want to make sure your Taco Tuesday is a massive success. Honestly, making these is more fun than troubleshooting a homemade popcorn disaster, so let’s clear things up!
Can I make the chipotle sauce ahead of time for my taco night?
Absolutely! The chipotle sauce is perfect for making a day or two in advance. Just mix it all up, pop it into an airtight container, and keep it in the fridge. The flavors actually meld together even more, which is a bonus! It makes getting these tacos ready on a busy Tuesday evening even quicker.
What kind of cheese is best for burnt cheese tacos?
While the recipe calls for a Mexican cheese blend, which is fantastic, you can totally play around with it! A sharp cheddar gives a nice tang, and Monterey Jack melts beautifully. Just make sure it’s all shredded – pre-shredded cheese sometimes has anti-caking agents that can affect how well it melts and browns. Sometimes I even mix in a little bit of crumbled cotija cheese right at the end for an extra salty punch!
How do I prevent the cheese from sticking to the skillet?
Ah, the age-old skillet question! The key here is a good nonstick skillet and not crowding the pan. Make sure your skillet is nice and hot *before* you add the cheese. A light spritz of cooking spray helps a lot too. The most important thing is to let that cheese actually get golden brown and crispy on the edges before you try to lift it. Once it starts browning, it usually releases from the pan pretty easily with a good rubber spatula. If it’s sticking, it probably just needs another minute or so to crisp up!
Are these tacos spicy? How can I adjust the heat?
They have a nice little kick from the chipotle peppers, but it’s more of a smoky warmth than a fiery burn unless you really load up on the chipotles! If you’re sensitive to spice, start with just one tablespoon of the chipotle peppers (or even less!) and taste your sauce. You can always add more. If you want *extra* heat, you can add an extra chipotle pepper or a pinch of cayenne pepper to the sauce. The cheese shell itself isn’t spicy, so it helps balance things out too!
Storing and Reheating Your Delicious Tacos
So, you made way too many of these amazing burnt cheese tacos? Lucky you! They actually hold up pretty well. The best way to store any leftovers is to let them cool down completely first. Then, pop them into an airtight container and stash them in the fridge. They should stay yummy for about 4-5 days.
Now, for reheating – this is super important for keeping that awesome crunch! Don’t even think about the microwave unless you absolutely have to. The real trick is to heat them up in a skillet (just like we made them!) over medium heat for a few minutes per side. This gets the cheese all melty and that shell perfectly crispy again! It’s almost as satisfying as reheating a good beef stew and having it taste just as good as the first day!
Estimated Nutritional Information
Just a heads-up, these numbers are estimates and can totally change depending on the specific ingredients you use, especially the brand of cheese and mayo. But generally, you’re looking at around 805 calories, 39g of carbs, 37g of protein, and about 56g of fat per taco. Pretty satisfying for such a quick meal, right?
Share Your Taco Tuesday Creations!
Okay, I *really* want to see your amazing burnt cheese tacos! Did you try them? Did you tweak them? Share your photos and tell me all about your Taco Tuesday adventures over on social media! And if you loved these Restaurant-Style Taco Tuesday Recipes at Home (2025), please give them a quick rating! For more behind-the-scenes foodie stuff and kitchen inspiration, check out my About page!
Burnt Cheese Tacos with Chipotle Sauce
Ingredients
Equipment
Method
- Make the dipping sauce: In a small bowl, whisk together the mayo, chipotle, lime juice, and salt. Taste and season with more salt or stir in more chipotle in adobo sauce for extra heat. Set aside.
- Make the tacos: Heat a large, nonstick skillet over medium heat and lightly coat with cooking spray. Once hot, sprinkle in 1/3 cup cheese in a 6-inch circle. It’s okay if there are gaps in the cheese, as long as the circle is large enough.
- Lay the tortilla on top of the cheese circle. There should be some pieces of cheese still visible around the edges of the tortilla. Then, sprinkle 1/4 cup cheese on top of half of the tortilla. Cook until the cheese in contact with the skillet starts to turn golden brown around the edges, about 2 minutes.
- Use a rubber spatula to gently lift the crispy cheese off the skillet and fold the bare half of the tortilla onto the cheesy half, and press to adhere.
- Cook until the center is completely melted and the crispy cheese is a deep golden brown on both sides, 2 minutes. Make the remaining tacos following these steps.
- Serve immediately with chipotle sauce for dipping.