
Okay, so you want to make pork chops, but you’re a little… nervous? I totally get it! For the longest time, pork chops felt like this intimidating dish. They’d either end up dry and sad, or sometimes rubbery. I remember one Thanksgiving, I tried them and honestly, they were a disaster! But trust me, after a lot of experimenting in my own kitchen, I’ve cracked the code. This is The Ultimate Pork Chops Recipes Guide for Beginners, and it’s all about making them perfectly juicy and delicious, right in your skillet. You’re going to be amazed at how simple it is to get restaurant-quality results without all the fuss. Let’s dive in and make some seriously tasty pork chops!
Why This Juicy Skillet Pork Chops Recipe is Perfect for Beginners
Okay, let me tell you why this recipe is your new best friend in the kitchen, especially if you’re just starting out. Cooking pork chops doesn’t have to be scary! This method is seriously foolproof. It focuses on a simple skillet technique that keeps things super manageable, and the ingredients? They’re probably already in your pantry or super easy to grab at the store. Plus, you’re guaranteed juicy, flavorful results every single time. You’ll feel like a pro chef without breaking a sweat!
- Super easy steps mean less room for error.
- Common pantry spices amp up the flavor without being complicated.
- The skillet method cooks them fast and locks in moisture.
- You get incredibly juicy and tender pork chops without any fuss!
Key Benefits of These Pork Chops
Seriously, the biggest win here is confidence. You’ll nail these perfectly juicy pork chops on your first try. The spice blend is a no-brainer – just mix and rub! Cooking them in a skillet with a lid means they cook evenly and stay moist. You get that gorgeous sear and then gentle cooking, all in one pan. It’s quick, it’s delicious, and it makes you look like you’ve been cooking for years!
Gathering Your Ingredients for The Ultimate Pork Chops Recipes Guide for Beginners
Alright, let’s talk about what you’ll need to make these amazing pork chops! The best part is, you probably have most of this stuff already. We’re not doing anything fancy here, just using simple, good-quality ingredients to make your pork chops shine. Using decent ingredients really makes a difference, trust me! For example, the oil isn’t just for frying; it helps get that beautiful golden crust on your chops.
Pork Chops: Choosing the Best Cut
For this recipe, I’m calling for four pork chops, each about 6 ounces and definitely 1-inch thick. Why 1-inch thick? Because it’s the sweet spot! It’s thick enough that you can get a great sear on the outside without cooking the inside too quickly and drying it out. You can totally use bone-in chops if you prefer – they often have a bit more flavor. Just know they might take a *tiny* bit longer to cook, so keep that thermometer handy!

Spice Blend for Flavorful Pork Chops
This is where the magic happens before we even hit the stove! We’re mixing up a quick blend of flour, chili powder, garlic powder, onion powder, smoked paprika, and black pepper. The flour helps create a little bit of a crust when it hits the hot pan. The spices? They’re totally classic and give the pork chops a wonderful, savory flavor that isn’t too spicy but has a great depth. Feel free to play around with your favorite spice rubs here too!
Ingredients for the Simple Pan Sauce
After the chops are cooked, we make a super-fast pan sauce right in the same skillet. This is seriously a game-changer! You’ll need low-sodium chicken stock – it’s less salty so you have more control. Then we’ve got apple cider vinegar for a little tang, honey (or brown sugar) to balance it all out, and a knob of butter at the end to make it glossy and rich. This sauce is so simple, but it tastes so fancy!
Step-by-Step Guide: Mastering The Ultimate Pork Chops Recipes Guide for Beginners
Okay, so you’ve got your ingredients ready, and you’re probably getting a little excited (and maybe a tad nervous!). Don’t worry, this is where it all comes together, and it’s way easier than you think. We’re going to take these beautiful pork chops and turn them into something truly special, right there in your skillet. Just follow along, do your best, and trust the process – you’ll be amazed at what you can create! For more amazing ideas, check out [juicy skillet pork chops] for inspiration.
Preparing Your Pork Chops for Cooking
First things first, let’s get these chops ready to party! Pull those pork chops out of the fridge about 30 minutes before you plan to cook them. This is super important – letting them come up to room temperature helps them cook more evenly. Give them a good pat down with paper towels to get them nice and dry. This helps create that perfect golden crust. Now, for the spice rub! Mix up your flour, chili powder, garlic powder, onion powder, smoked paprika, and pepper in that little bowl, then rub it all over both sides of the chops. Make sure they’re nicely coated!
Searing and Cooking Your Juicy Skillet Pork Chops
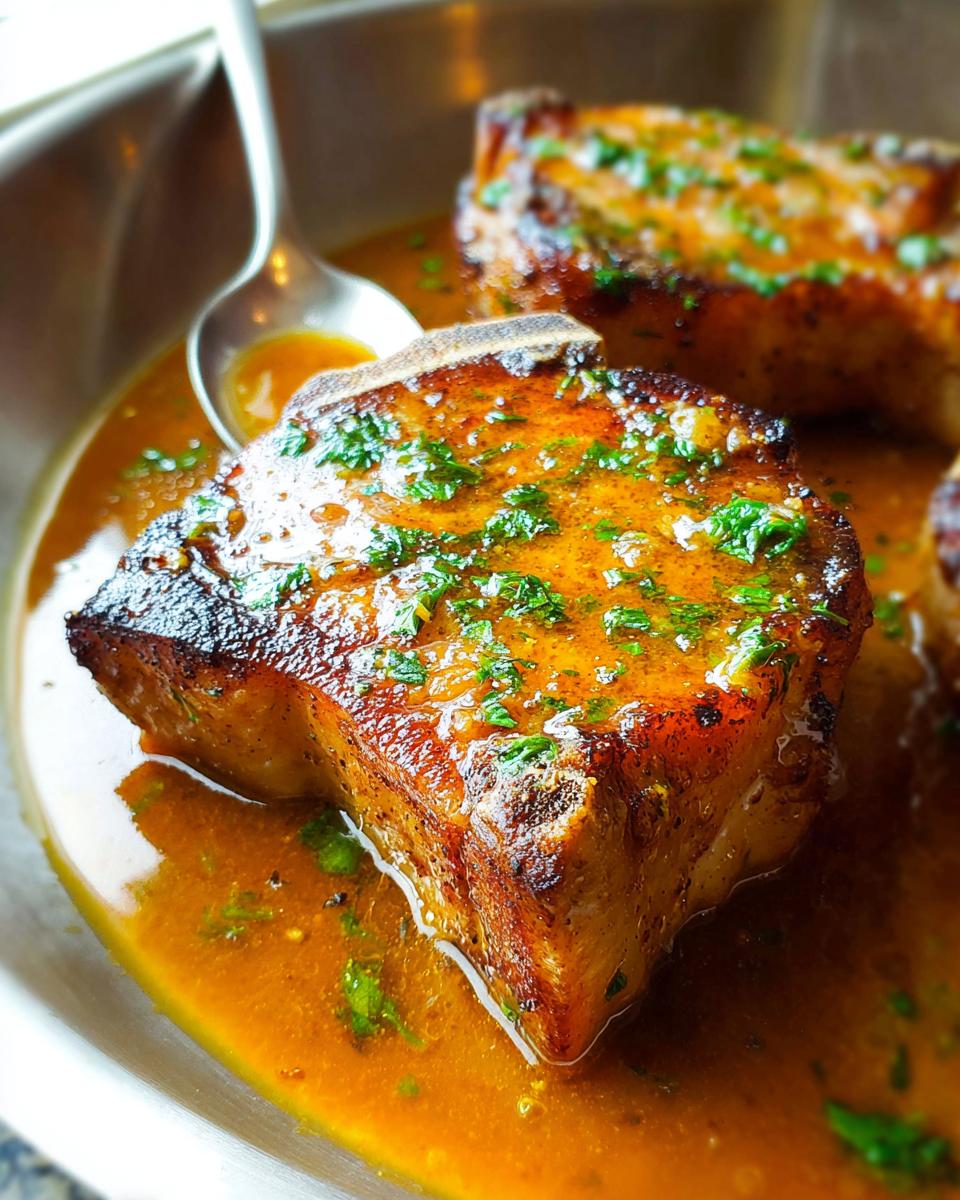
Get your skillet nice and hot over medium-high heat with that tablespoon of oil. You want it to be shimmering, almost smoky – that’s how you know it’s ready! Carefully lay the seasoned pork chops in the hot skillet. Let them sear, undisturbed, for about 2 to 3 minutes until they’re beautifully golden brown. Don’t be tempted to move them around too much during this stage! Now, flip them over. If your chops have a nice thick edge of fat, use your tongs to hold them on that side for about 30 seconds to let it get nice and crispy. Then, reduce the heat to low, pop a lid on the skillet, and let them cook. This is where they become super juicy! Start checking the temperature with your instant-read thermometer after about 5 minutes, and keep checking every couple of minutes until it reads 145°F in the thickest part. Remember, we don’t want to overcook them!
Resting and Making the Pan Sauce
This step is NON-NEGOTIABLE for juicy pork chops! As soon as they hit that perfect 145°F, carefully take the chops out of the skillet and put them on a plate. Loosely tent them with aluminum foil and let them rest for about 5 minutes. Trust me, this allows all those delicious juices to redistribute throughout the meat, making them incredibly tender. While they’re resting, we’re going to make that dreamy pan sauce. Turn the heat back up to medium-high under the same skillet. Pour in the chicken stock, a splash of apple cider vinegar, and the honey. Let it bubble and simmer, scraping up all those tasty browned bits from the bottom of the pan. Cook it down until it’s reduced by about half. Give it a quick taste – need a pinch more salt or a tad more tang? Adjust it now! Finally, take the skillet *off* the heat, wait for the sauce to stop bubbling, and swirl in that tablespoon of butter until it melts. This makes the sauce super glossy and rich.

Serving Your Perfectly Cooked Pork Chops
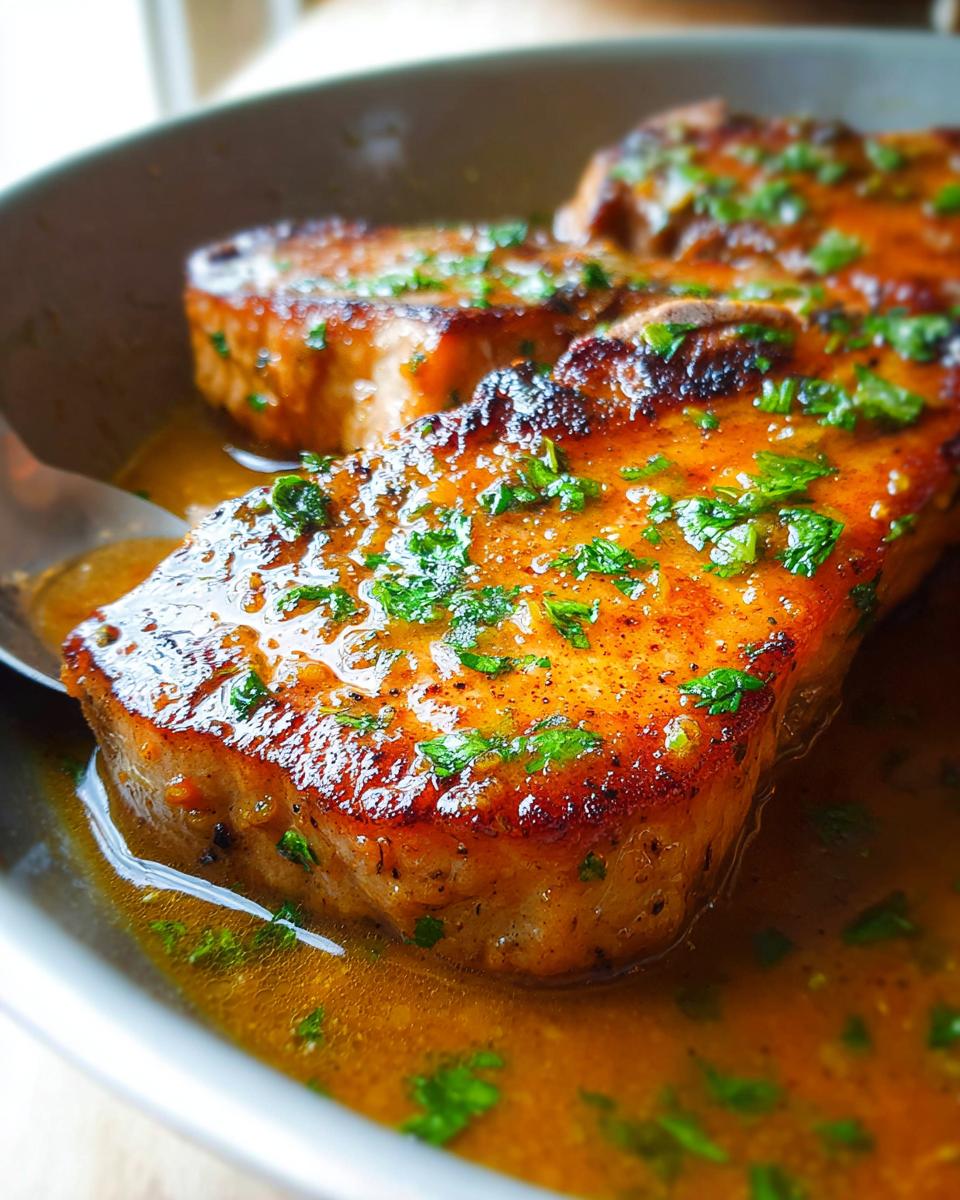
Now for the grand finale! You can either place the rested pork chops back into the skillet with the amazing pan sauce for a quick coat, or you can slice them and toss the slices in the sauce. Spoon that glorious sauce right over the top. If you’re feeling fancy – and why not?! – sprinkle on some fresh chopped parsley. Serve immediately and get ready for the compliments!
Essential Equipment for The Ultimate Pork Chops Recipes Guide for Beginners
To make these incredibly juicy pork chops without any fuss, you don’t need a whole kitchen full of gadgets. Just a few trusty essentials will do the trick! Having the right tools makes the whole cooking process so much smoother, especially when you’re just getting started. Having these on hand means you can focus on getting those perfect, tender results without feeling overwhelmed. It’s all about making your life easier in the kitchen!
- Skillet with a lid: This is your main workhorse! A good skillet is key for searing, and the lid traps heat and steam to cook the chops through evenly and keep them moist.
- Small bowl: Perfect for mixing up that flavorful spice blend.
- Tongs: Essential for safely flipping those hot pork chops and holding them to render the fat.
- Instant-read thermometer: This is your secret weapon for perfectly cooked, never-overcooked pork chops. Seriously, it’s a game-changer for beginners!
- Plate and aluminum foil: For that crucial resting period – don’t skip this!
- Wooden spoon: Handier than you think for scraping up all those delicious bits for the sauce.
Tips for Success: Achieving Juicy Pork Chops Every Time
Okay, so you’ve made the chops, but let’s talk about really nailing them. It’s all about a few little secrets that make a HUGE difference. You want that perfect, tender bite every single time, right? Forget those dry, sad pork chops of the past! We’re going to make sure yours are always juicy and delicious. It’s a couple of simple tricks that elevate your cooking game big time, and they’re way easier than you think. Honestly, these are the things I learned that completely changed how I make pork chops!
Temperature is Key for Juicy Pork Chops
Seriously, if there’s one piece of advice I can give you for perfectly cooked pork chops, it’s this: use an instant-read thermometer. It’s your new best friend! Pork is lean, and it’s super easy to overcook it, which is what usually leads to dryness. We’re aiming for an internal temperature of 145°F. That might sound a little low if you’re used to cooking chicken to 165°F, but for pork, it’s perfect. It ensures the pork is cooked safely and is still incredibly juicy and tender. Just pop it in the thickest part, avoid the bone, and you’re golden!
Don’t Skip the Resting Period
This is probably the most important step for juiciness after cooking, and so many people skip it! Once those chops hit 145°F and you pull them from the pan, don’t cut into them right away. Put them on a plate, tent them loosely with foil, and let them rest for at least 5 minutes. What’s happening is the juices, which have been pushed to the center during cooking, are now able to relax and spread back out into the meat. If you cut too early, all those delicious juices just pour out onto the plate, leaving you with a drier chop. Patience really is a virtue here!
Variations and Substitutions for Your Pork Chops
Okay, so this recipe is fantastic as is, but wouldn’t it be even better if you could tweak it just a little bit? I love playing around with recipes, and this one is super forgiving! If you don’t have avocado oil, no worries at all – vegetable oil works just fine, or even a good olive oil in a pinch. And for the spice blend, that’s totally customizable. If you’re not a fan of chili powder, just leave it out or add a different kick like a pinch of cayenne. The flour in the rub is great for a bit of crust, but if you’re going gluten-free, you can totally skip it; the flavor will still be amazing! You could also try a paprika-heavy rub for a smoky vibe, or boost the garlic and onion powders if you love those flavors.
Thinking about the pan sauce? You can absolutely adapt that too. If you’re all about less sugar, try a sugar-free sweetener instead of honey or brown sugar. And for a truly special occasion, imagine sautéing some sliced apples and onions in the skillet *after* you take out the chops, then adding your stock, vinegar, and honey. That makes a whole new flavor profile! And remember those chop thickness notes? Thinner chops cook super fast, so watch them closely. Thicker chops mean a bit more patience, but they often end up extra juicy. For even more recipe ideas, check out [gluten-free recipes] for inspiration.
Frequently Asked Questions About Cooking Pork Chops
Alright, let’s tackle some of those burning questions you might have about making these pork chops. It’s totally normal to have a few! We’re aiming for perfect, juicy results every time, so let’s clear up any confusion. These tips are what helped me go from stressed-out beginner to pork chop pro!
How to Tell When Pork Chops Are Done?
The absolute best way to tell if your pork chops are done is to use an instant-read thermometer. Pop it into the thickest part of the chop, and aim for 145°F. Anything less might not be safe, and anything more will likely mean they’re a bit dry. They should look slightly pink in the very center, which is totally normal and a sign of juiciness!
Can I Make These Pork Chops Ahead of Time?
You can absolutely cook the pork chops ahead of time! Let them cool completely, then store them in an airtight container in the fridge for up to 3 days. To reheat, I like to do it gently in the pan with a little bit of sauce or stock to help keep them moist, or pop them in a low oven. Just be gentle so they don’t dry out!
What If My Pork Chops Are Tough?
Oh no, tough pork chops are the worst! Usually, this happens from overcooking them. Make sure you’re using that thermometer and pulling them out right at 145°F. Also, don’t skip the resting period – that’s crucial for juiciness! If they do come out a little tougher than you’d like, slicing them thinly and tossing them in that delicious pan sauce can really help make them more tender.
Nutritional Information for Juicy Skillet Pork Chops
Wondering what’s in these delicious pork chops? Here’s a little snapshot! These figures are estimates per serving (one pork chop with sauce), but remember, the exact numbers can shift a bit depending on the specific brands you use and how much sauce you slather on. So, you’re looking at around 369 calories, 46 grams of protein – wowza! – and about 14 grams of fat. It’s a tasty way to get a good dose of protein without breaking the bank on calories!
Share Your Experience with The Ultimate Pork Chops Recipes Guide for Beginners
So, how did your pork chops turn out? I’d absolutely LOVE to hear all about it! Did you try any fun variations? Have any questions pop up while you were cooking? Please, hit that comment button below and share your results, your tips, or anything else on your mind. And hey, if you loved this recipe, please give it a rating – it really helps other home cooks find it! If you need to get in touch directly, feel free to [contact me].

Juicy Skillet Pork Chops for Beginners
Ingredients
Equipment
Method
- Take the pork chops out of the refrigerator and season both sides with salt. Let them rest at room temperature for 30 minutes.
- In a small bowl, mix the flour, chili powder, garlic powder, onion powder, smoked paprika, and 1/2 teaspoon of black pepper.
- Pat the chops dry with paper towels, then rub the spice mixture all over.
- Heat the oil in a skillet with a lid over medium-high heat. When the oil is hot and shimmery, add the pork. Cook until golden, 2 to 3 minutes.
- Flip the pork. If the chops have a fat edge, use tongs to hold them upright until the fat sizzles and browns, about 30 seconds.
- Reduce the heat to low, then cover the skillet. Cook for 6 to 12 minutes, or until an instant-read thermometer inserted into the thickest part of the chop reads 145°F. Start checking for doneness at 5 minutes, then every 2 minutes after.
- Transfer the pork chops to a plate, then loosely cover them with aluminum foil. Let the pork rest for 5 minutes.
- Increase the heat to medium-high in the same skillet, then add the chicken stock, vinegar, and honey. Bring the sauce to a simmer and cook until reduced by half. Scrape the bottom of the pan to loosen any stuck bits. Taste, then adjust with additional salt, vinegar, or honey.
- Slide the skillet off the heat, wait until the sauce stops simmering, then swirl in the butter.
- Return the pork chops to the pan and spoon the sauce over them, or slice the chops and toss the slices in the sauce. Sprinkle with fresh parsley and serve.