Did you know that you only need 3 ingredients to make delicious banana oatmeal pancakes that taste like a treat while still being packed with wholesome goodness?
These fluffy banana oat pancakes aren’t just a delightfully healthy breakfast option for lazy mornings they’re also an excellent post-workout meal with an impressive 12g of protein per serving. Whether you’re following a gluten-free diet or simply looking for healthy pancakes that don’t compromise on taste, this recipe delivers on all fronts.
Best of all, these gluten-free banana pancakes come together effortlessly in your blender, making cleanup a breeze. My kids actually love helping me make them, and they never leave a single crumb behind! However, it’s worth noting that the oats will continue absorbing moisture as the batter sits, so the consistency will change as you work.
In this guide, I’ll walk you through exactly how to make banana oatmeal pancakes that are perfectly fluffy with a satisfying texture. From selecting the right ingredients to mastering the cooking technique, you’ll be flipping these nutritious pancakes like a pro in no time. Let’s get started!
Essential Ingredients and Tools

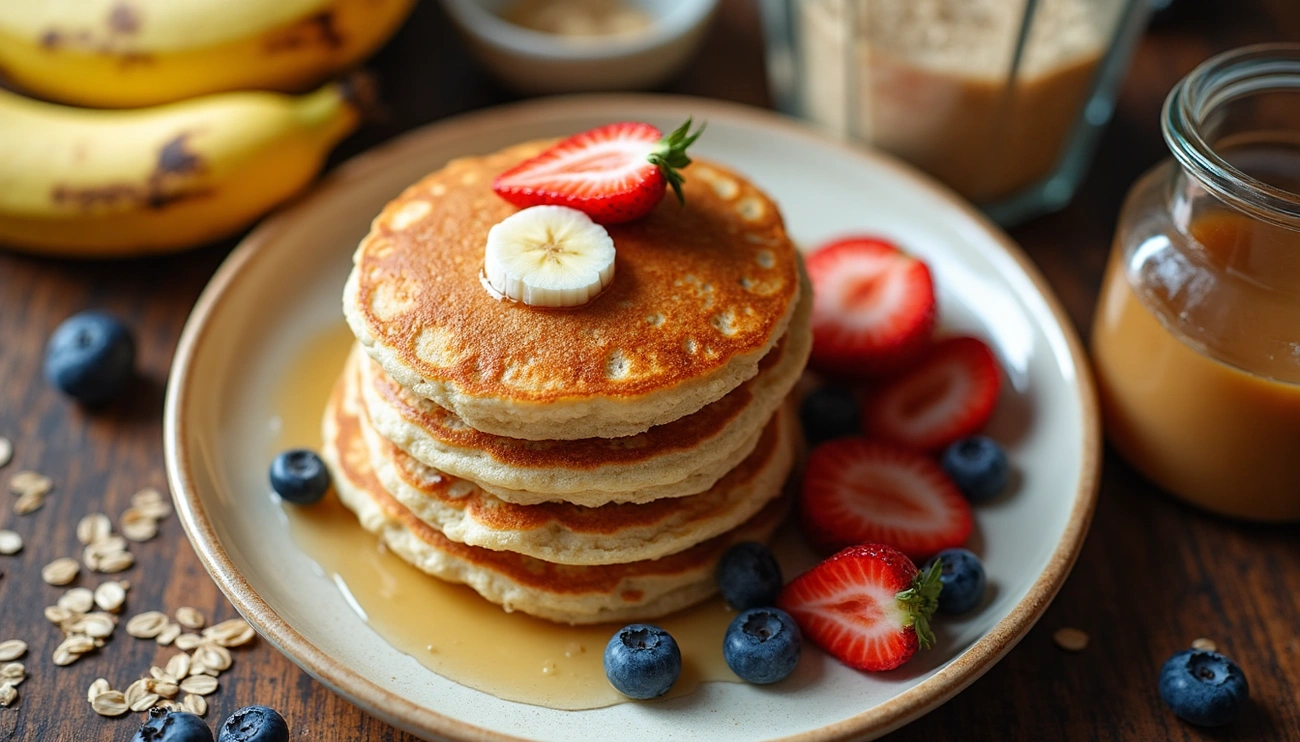
Image Source: Slender Kitchen
The simplest banana oat pancakes require just three core ingredients—ripe bananas, oats, and eggs. Nevertheless, adding a few more items creates that perfect fluffy texture and enhanced flavor that makes these pancakes truly special.
Key ingredients for banana oat pancakes
The foundation of banana oatmeal pancakes consists of these essential components:
- Rolled oats: These form the base of our gluten-free pancakes, essentially replacing traditional flour. Old-fashioned rolled oats work best for this recipe.
- Ripe bananas: These naturally sweeten the pancakes and provide moisture. The riper your bananas (with brown spots), the sweeter your pancakes will be.
- Eggs: These bind everything together and help create structure in your pancakes.
- Milk: Any type works well—almond milk, coconut milk, or regular dairy milk. This adds moisture and helps achieve the right batter consistency.
Additional ingredients that elevate your pancakes include:
- Baking powder: Creates those fluffy, airy pancakes we all love
- Vanilla extract: Adds warmth and depth of flavor
- Cinnamon: Complements the banana flavor perfectly
- Salt: A small pinch enhances all other flavors
Choosing the right oats and bananas
Not all oats perform equally in banana oatmeal pancakes. Old-fashioned rolled oats are ideal for this recipe because they provide the perfect texture. Quick oats tend to become too mushy, while steel-cut oats remain too firm and won’t cook properly in pancake form.
For those requiring gluten-free pancakes, it’s important to select certified gluten-free oats. Although oats are naturally gluten-free, they’re often processed in facilities that handle wheat, potentially causing cross-contamination. Look specifically for packages labeled “certified gluten-free” to ensure safety.
Regarding bananas, the ripeness level significantly impacts both flavor and texture. Overripe bananas with numerous brown spots deliver the sweetest, most flavorful pancakes. They’re naturally softer, making them easier to mash and incorporate into your batter. If using medium-sized bananas, you’ll need approximately 1-1.5 cups of mashed banana for standard recipes.
Blender vs. food processor: what works best
Both appliances can create banana oatmeal pancakes, but each offers distinct advantages depending on your desired outcome.
A blender excels with liquid-heavy mixtures when your goal is achieving a perfectly smooth texture. Its tall, narrow design creates a vortex that effectively purees ingredients into a consistent batter. This makes blenders particularly effective for banana oat pancakes when you want a smoother, more traditional pancake texture without visible oat pieces.
Conversely, food processors give you more control over texture. With the pulsing function, you can maintain some textural integrity if you prefer pancakes with more bite. Food processors furthermore reduce the risk of overmixing, which can develop too much gluten and result in dense, chewy pancakes.
For beginners, I recommend using a blender for banana oatmeal pancakes. High-powered blenders like Vitamix or NutriBullet work exceptionally well because their strong blades effectively break down oats into a flour-like consistency. For easier blending, place wet ingredients closest to the blades—this means adding them first in a traditional blender or last in an inverted blender like a NutriBullet.
Essentially, both tools will work, but blenders typically create a smoother, more uniform batter that most closely resembles traditional pancakes, primarily because they handle the liquid-to-solid ratio in this recipe more effectively.
How to Make Banana Oatmeal Pancakes

Image Source: The Cooking Foodie
Making banana oatmeal pancakes is surprisingly simple, especially with a blender doing most of the work for you. The process breaks down into four straightforward steps that yield perfect, fluffy pancakes every time.
Step 1: Blend all ingredients until smooth
Creating the perfect banana oatmeal pancake batter starts with proper blending:
- Add all ingredients to your blender in the right order. For best results, place wet ingredients (bananas, milk, eggs, vanilla, oil) closest to the blades. Then add dry ingredients (oats, baking powder, cinnamon, salt).
- Blend on medium-to-high speed until the mixture becomes smooth. This typically takes between 30 to 60 seconds, depending on your blender’s power.
- The batter should have a pourable yet slightly thick consistency. If it seems too thick, add a tablespoon of milk at a time until you reach the desired texture.
The beauty of blender pancakes is that the oats transform into a flour-like consistency while the bananas get completely incorporated, creating a smooth batter that cooks up beautifully.
Step 2: Let the batter rest
This often-overlooked step makes a tremendous difference in pancake quality:
- After blending, let your batter rest for 5-10 minutes at room temperature.
- During this resting period, two important things happen: the flour (ground oats) fully hydrates, and the leavening agents distribute evenly throughout the batter.
This resting time allows the starches and proteins in the oats to release, giving your pancakes a better lift and more tender texture. Additionally, any small lumps of flour will soften naturally, preventing dry pockets in your finished pancakes.
For best results, don’t let the batter rest longer than 30 minutes, as the leavening agents may lose their effectiveness, resulting in flatter pancakes.
Step 3: Cook on medium heat until golden
Proper cooking temperature is crucial for perfect banana oat pancakes:
- Heat a griddle or nonstick skillet over medium heat. The pan is ready when a drop of water sizzles on contact.
- Lightly grease the surface with coconut oil, butter, or cooking spray.
- Pour approximately ¼ cup of batter for each pancake, leaving space between them for expansion.
- Cook until you see small bubbles forming on the surface of the pancakes, which typically takes 2-3 minutes.
- The edges should begin to look dry and slightly matte rather than glossy – this is your visual cue that the pancakes are ready to flip.
If your pancakes brown too quickly before bubbles form, your heat is too high. Reduce to medium-low and continue cooking.
Step 4: Flip and finish cooking
The final stage requires patience and proper technique:
- Once bubbles have formed and edges look dry, gently slide a spatula under each pancake and flip with a quick, confident motion.
- Cook the second side for 1-2 minutes until golden brown and the pancake has puffed up slightly.
- The second side typically cooks faster than the first, so watch carefully to prevent burning.
Remember that the batter will gradually thicken between batches as the oats continue to absorb liquid. If necessary, thin with 1-2 tablespoons of milk to maintain the right consistency for later batches.
Transfer cooked pancakes to a warm plate while you finish the remaining batter. For extra fluffy results, avoid pressing down on the pancakes with your spatula while they cook – this deflates the air bubbles that create that perfect texture.
Tips for Perfect Texture and Flavor

Image Source: The Kitchn
Perfecting the texture of your banana oatmeal pancakes requires attention to a few key details that many home cooks overlook. Let’s dive into the most common challenges and their solutions for achieving that ideal fluffy consistency.
Avoiding gummy or undercooked centers
Gummy centers in banana oatmeal pancakes often result from either overmixing or improper cooking temperature. Indeed, overmixing causes the gluten to develop, creating rubbery disks instead of light, fluffy pancakes. Mix your batter just until the wet and dry ingredients are incorporated—a few lumps are perfectly fine!
Another culprit behind gummy centers is cooking temperature. If your pan is too hot, the outside will cook too quickly while the inside remains raw. Conversely, if the temperature is too low, your pancakes will soak up oil and develop an unpleasant texture. For optimal results, preheat your pan over medium heat (around 350°F) and test it by sprinkling a few drops of water—they should sizzle gently and evaporate quickly.
Notably, for banana oat pancakes specifically, soaking the oats plays a crucial role. Allow your batter to rest for 5-10 minutes before cooking, which gives the oats time to soften and begin breaking down. This ensures they won’t interfere with your pancakes’ fluffy texture.
How to know when to flip
Timing the flip perfectly transforms good banana oatmeal pancakes into great ones. Look for these telltale signs:
- Bubbles have formed on the surface and begun to pop
- Edges appear set and slightly dry (no longer glossy)
- Bottom has turned golden-brown (peek underneath with your spatula)
This typically takes about 2-3 minutes on the first side. The second side will cook faster, usually requiring only 1-2 additional minutes. Flipping too early results in pancakes that fall apart, whereas waiting too long leads to burning.
If you notice your pancakes browning too quickly before bubbles form, your heat is too high. Subsequently, reduce to medium-low and continue cooking. Remember that additional ingredients like chocolate chips or fruit may require slightly lower heat (around 365-370°F) as their sugar content can cause quicker browning.
Adjusting batter thickness without ruining texture
As your banana oatmeal pancake batter sits, it will naturally thicken since the oats continue absorbing liquid. To thin an overly thick batter, add milk one tablespoon at a time until you reach the desired consistency. This gradual approach prevents making the batter too runny.
Conversely, if your batter is too thin, avoid simply adding more flour—this can make pancakes dense. Instead, try these alternatives:
- Add 1 tablespoon of tapioca, corn, or potato starch and wait 5 minutes
- Mix in 2 teaspoons to 1 tablespoon of coconut flour, which absorbs liquid like a sponge (wait 5 minutes for absorption)
- Incorporate a mashed banana, which naturally thickens the batter
Always cook a test pancake before committing to a full batch. This allows you to assess and adjust your batter’s consistency and your cooking temperature for perfectly textured banana oatmeal pancakes every time.
Customizations and Variations
Beyond mastering the basic recipe, the joy of banana oatmeal pancakes lies in their versatility. Once you’ve got the foundation down, it’s time to explore the numerous ways to customize your breakfast creation.
Add-ins: chocolate chips, nuts, or fruit
Transforming basic banana oat pancakes into extraordinary breakfast treats is as simple as folding in a few extras. For a touch of indulgence, sprinkle dark chocolate chips or chunks into your batter just before cooking. The melty pockets of chocolate complement the banana flavor perfectly.
Fresh or frozen berries make excellent additions too. Blueberries, raspberries, or sliced strawberries can be gently folded into the batter or arranged on top of each pancake as it cooks. For texture and nutrition, consider adding:
- Chopped walnuts, pecans, or almonds
- Hemp, chia, or ground flax seeds
- Finely shredded carrots or apples
- A dollop of peanut butter or almond butter swirled into the batter
Vegan and dairy-free swaps
Making these pancakes vegan-friendly requires just a couple of thoughtful substitutions. Replace eggs with flax eggs (1 tablespoon ground flaxseed mixed with 3 tablespoons water per egg). As for milk, any plant-based variety works beautifully—almond, oat, coconut, or soy milk all yield excellent results.
For additional sweetness without honey or regular maple syrup, consider date paste or agave syrup. These alternatives maintain the pancakes’ wholesome profile while keeping them completely plant-based.
Mini pancakes and sheet pan options
For busy mornings or when feeding a crowd, consider alternative cooking methods. Mini pancakes (using just 1-2 tablespoons of batter per pancake) cook faster and are perfect for little hands or meal prep.
Even more efficient is the sheet pan method. Simply pour your batter into a parchment-lined baking sheet, add your favorite toppings, and bake at 425°F until golden. You can even divide the sheet into sections with different toppings to please everyone in one batch—perhaps chocolate chips in one corner, blueberries in another, and plain in the third.
Sheet pan pancakes freeze exceptionally well, making them ideal for hectic weekday breakfasts.
Storing and Reheating Your Pancakes
Leftover banana oatmeal pancakes need not go to waste! With proper storage techniques, I can enjoy these delicious treats throughout the week or even months later.
How to store in fridge or freezer
For refrigerator storage, I place completely cooled pancakes in an airtight container or zip-top bag. These will keep fresh for 3-5 days in the refrigerator. Consequently, I can prepare a batch on Sunday and enjoy them until midweek.
For freezer storage, the flash-freezing technique works best. First, I arrange cooled pancakes in a single layer on a parchment-lined baking sheet, ensuring they don’t touch. After freezing them solid (about an hour), I transfer them to a freezer-safe bag or container. Flash-freezing prevents them from sticking together as one big pancake blob. Properly stored, banana oat pancakes remain good for up to 3 months in the freezer.
Best ways to reheat without drying out
The toaster reigns supreme for reheating banana oatmeal pancakes! I simply pop frozen pancakes directly into the toaster on a high setting for about a minute – no defrosting required. This method creates pancakes with crispy edges and warm, pillowy centers.
For multiple pancakes simultaneously, the oven works well. I preheat to 350°F, place pancakes on a foil-covered baking sheet, and heat for 5-10 minutes. Covering with foil prevents them from drying out.
Microwave reheating works too, albeit with slightly different results. I place 1-5 pancakes on a microwave-safe plate and heat for 20-60 seconds depending on quantity. This method yields soft, fluffy pancakes without crispy edges.
Make-ahead tips for busy mornings
Undeniably, preparing ahead saves precious morning time. I often make the batter the night before, store it covered in the refrigerator, and simply stir before cooking[263]. The batter remains usable for about 3 days.
For ultimate convenience, I occasionally make a double or triple batch of banana oatmeal pancakes specifically for freezing. On hectic mornings, I just grab a few from the freezer and reheat while preparing lunches or getting dressed. This approach has saved countless breakfast struggles in my household!
Conclusion
Banana oatmeal pancakes truly represent the perfect balance between nutritious ingredients and delicious flavor. Throughout this guide, we’ve explored how simple ingredients like ripe bananas, oats, and eggs transform into fluffy, protein-rich pancakes that satisfy both health-conscious eaters and those with gluten sensitivities.
First and foremost, selecting the right ingredients makes all the difference. Ripe bananas provide natural sweetness, while old-fashioned rolled oats create the ideal texture. Additionally, the blender method simplifies the entire process, turning your ingredients into smooth batter with minimal effort.
The cooking technique matters just as much as the ingredients. Patience during the resting period allows the oats to properly hydrate, while maintaining medium heat ensures golden exteriors with perfectly cooked centers. Most importantly, watching for those telltale bubbles before flipping guarantees pancakes that are fluffy rather than gummy.
Customization options make these pancakes endlessly adaptable. Whether you prefer adding chocolate chips, nuts, or fresh berries, these pancakes accommodate various dietary preferences. Likewise, vegan substitutions work remarkably well, proving these pancakes can please everyone at your breakfast table.
Storage solutions extend the enjoyment beyond a single morning. Flash-freezing techniques preserve your pancakes for up to three months, while proper reheating methods ensure they taste nearly as delicious as when freshly made.
These banana oatmeal pancakes have become a staple in my household for good reason. They deliver the comfort of traditional pancakes while providing substantial nutrition to fuel busy days. Next time your bananas develop those perfect brown spots, remember this recipe instead of reaching for banana bread. Your breakfast routine will undoubtedly thank you!
FAQs
Q1. Can I make banana oatmeal pancakes without a blender?
Yes, you can make banana oatmeal pancakes without a blender. Simply mash the bananas with a fork, then whisk in the eggs, oats, and other ingredients until smooth. The oats will blend right in, no blender needed.
Q2. How do I prevent my banana oatmeal pancakes from becoming gummy?
To avoid gummy pancakes, avoid overmixing the batter and cook at the right temperature. Let the batter rest for 5-10 minutes before cooking to allow the oats to soften. Cook on medium heat (around 350°F) and flip when bubbles form on the surface and edges appear dry.
Q3. Can I make these pancakes vegan?
Absolutely! Replace eggs with flax eggs (1 tablespoon ground flaxseed mixed with 3 tablespoons water per egg) and use plant-based milk like almond, oat, or soy milk. For sweetness, consider using date paste or agave syrup instead of honey.
Q4. How long can I store banana oatmeal pancakes?
You can store banana oatmeal pancakes in an airtight container in the refrigerator for 3-5 days. For longer storage, freeze them for up to 3 months. To freeze, lay cooled pancakes on a baking sheet, freeze until solid, then transfer to a freezer-safe bag.
Q5. What’s the best way to reheat frozen banana oatmeal pancakes?
The best way to reheat frozen banana oatmeal pancakes is in a toaster. Simply pop the frozen pancakes directly into the toaster on a high setting for about a minute. This method creates pancakes with crispy edges and warm, pillowy centers without the need for defrosting.