Okay, confession time: some of my favorite dinners involve absolutely zero fuss and maximum fun, and these Ground Beef Recipes With Homemade Crunchwraps for Fun Dinners totally fit the bill! I remember the first time I made these for my nephews. Their little faces lit up with pure joy as they got to assemble their own crunchy, cheesy creations. It was so much better than just serving them plain tacos, and honestly, it’s way better than anything you can grab from a drive-thru. Making them at home means you control *exactly* what goes in – more cheese, less spice, your favorite toppings – and that makes all the difference. Trust me, once you try making these at home, you’ll wonder why you ever bothered with anything else!
Why You’ll Love These Ground Beef Recipes With Homemade Crunchwraps
Seriously, these homemade crunchwraps are a total lifesaver for busy weeknights and a guaranteed hit with anyone you serve them to! Here’s why they’re so awesome:
- Super Easy to Make: The ground beef cooks up lightning fast, and assembly is pretty much foolproof – even the kiddos can help!
- Packed with Flavor: That savory ground beef, melty cheese, and the satisfying crunch from the tostada shell? Oh yeah, it’s a flavor explosion.
- Kid-Approved Fun: They’re practically a party in a tortilla! Kids love getting to build their own and the crunchy texture is a huge hit.
- Totally Customizable: This is where the magic really happens. Load ’em up with your favorite toppings – lettuce, salsa, sour cream, whatever your heart desires!
Gather Your Ingredients for Homemade Crunchwraps
Alright, let’s get down to business! To make these amazing crunchwraps that everyone will be raving about, you’ll want to gather up some goodies. Don’t worry, it’s not a crazy shopping list – we’re keeping it simple and delicious. It all starts with a solid base, and then we build out from there. Grab your apron, and let’s get these ingredients ready to go!
For the Ground Beef Filling
This is where all the savory goodness comes from! You’ll need:
- 1 pound of good ol’ ground beef (80/20 is my go-to for flavor!)
- 1 packet of taco seasoning – yes, the store-bought kind is totally fine!
- 1/2 cup of water – just to get that seasoning mixed in nicely.
For Assembling Your Crunchwraps
Now for the fun part – building these beauties! Make sure you have these on hand:
- 8 large flour tortillas (these are your wrappers!)
- 8 tostada shells (for that essential crunch!)
- 2 cups of shredded cheddar cheese (or a Mexican blend, whatever you love!)
- 1 cup of shredded lettuce (for a little freshness)
- 1/2 cup of sour cream (for creaminess)
- 1/2 cup of salsa (your favorite kind, of course!)
And that’s it! See? Totally doable ingredients for a dinner that feels extra special.
Step-by-Step Guide to Making Ground Beef Recipes With Homemade Crunchwraps
Alright, let’s get cooking! Making these homemade crunchwraps is way simpler than you might think, and honestly, it’s where all the fun is. We’re going to go from raw ingredients to a totally satisfying dinner in no time at all. Just follow these steps, and you’ll be a crunchwrap pro before you know it. Don’t be afraid to get your hands a little messy – that’s part of the delicious process! And if you’re looking for more fun burrito-style ideas, you might want to check out this killer grilled chicken burrito recipe too!
Prepare the Flavorful Ground Beef Filling
First things first, we gotta get that yummy beef filling ready. Grab your biggest skillet and pop it over medium-high heat. Throw in your pound of ground beef and just let it cook, breaking it up with your spatula as you go. Once it’s all browned up and there’s no pink left, drain off any extra grease – nobody wants a greasy crunchwrap! Now, pour in that packet of taco seasoning and the water. Give it a good stir and let it simmer for about 2-3 minutes. You want that sauce to thicken up just enough to coat the beef nicely. It should smell amazing right about now!
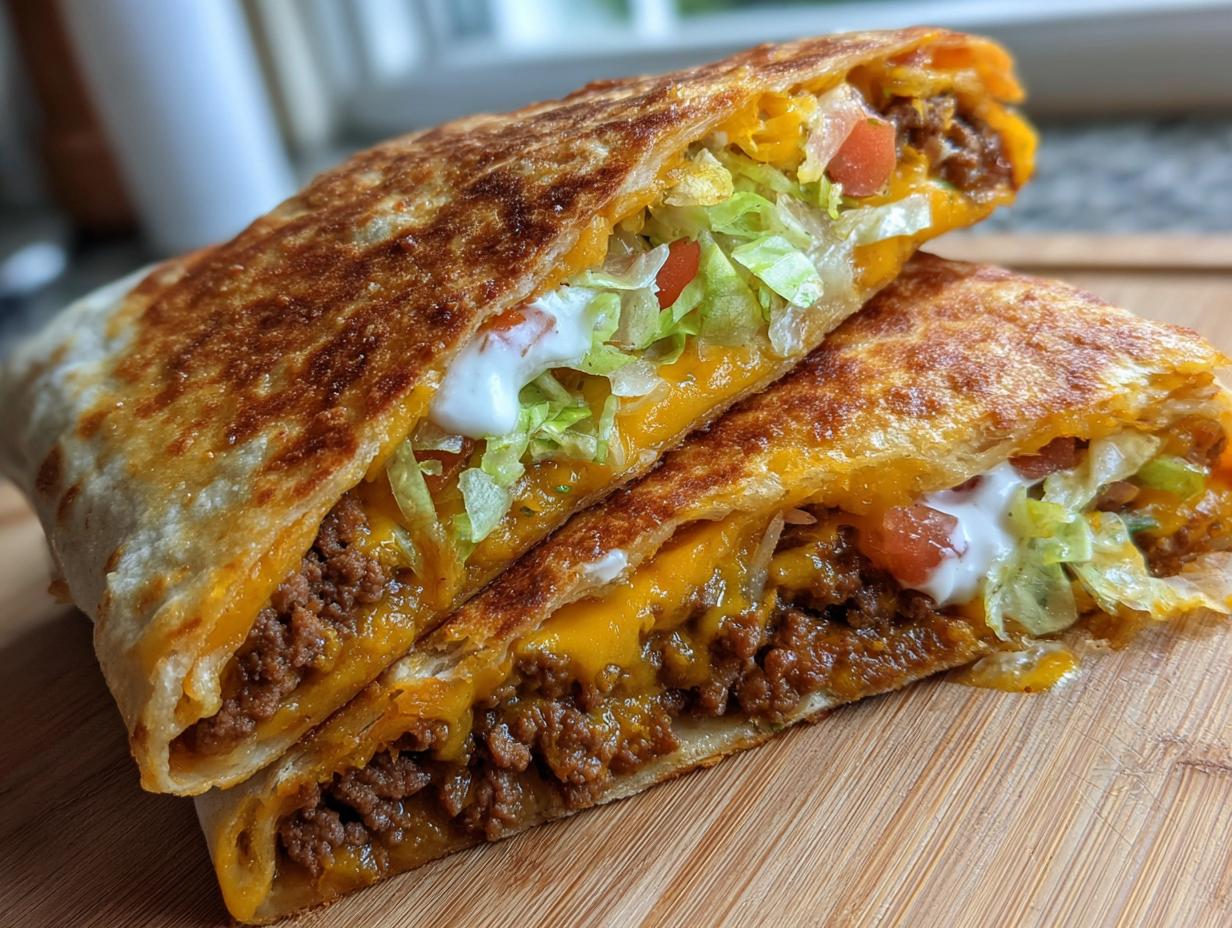
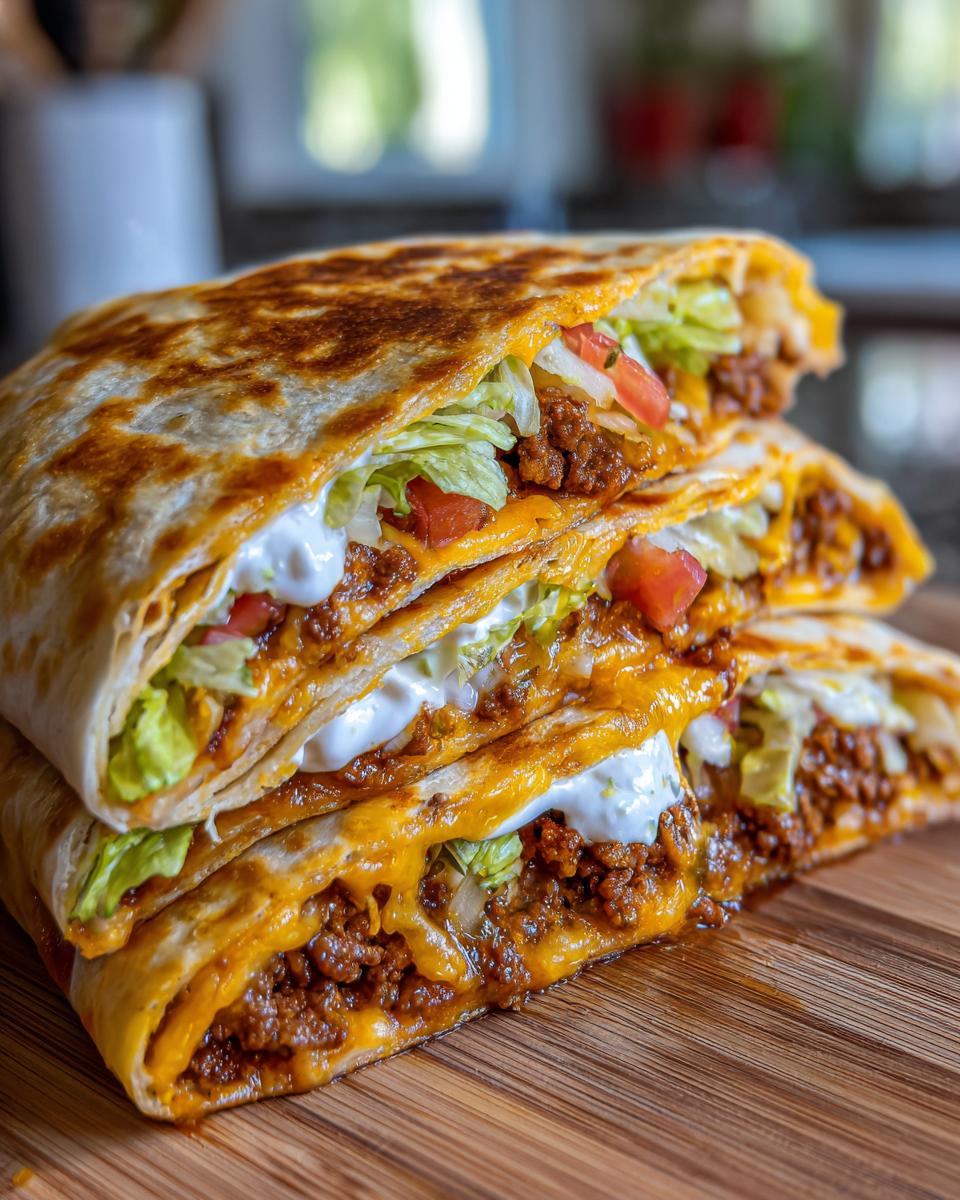
Assemble Your Homemade Crunchwraps
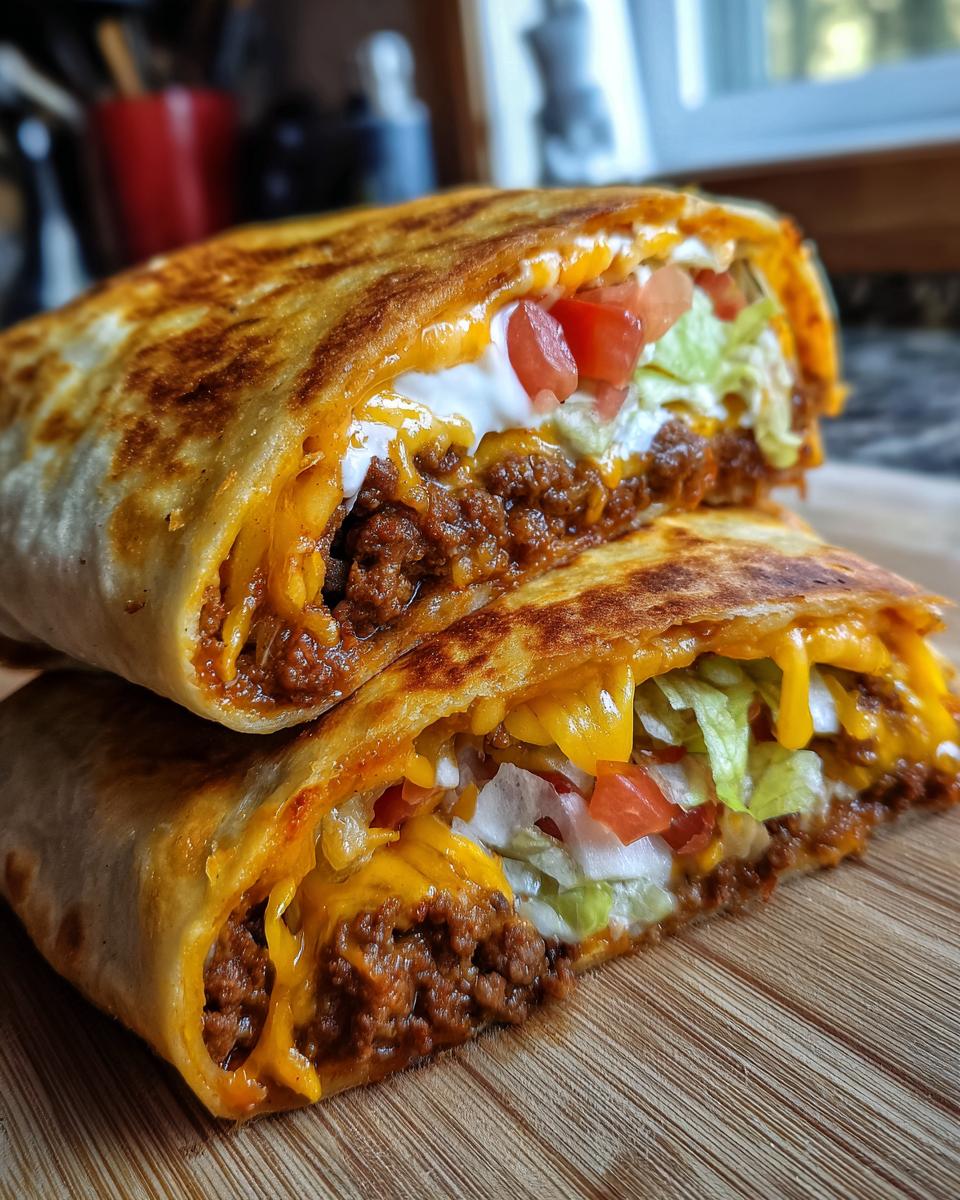
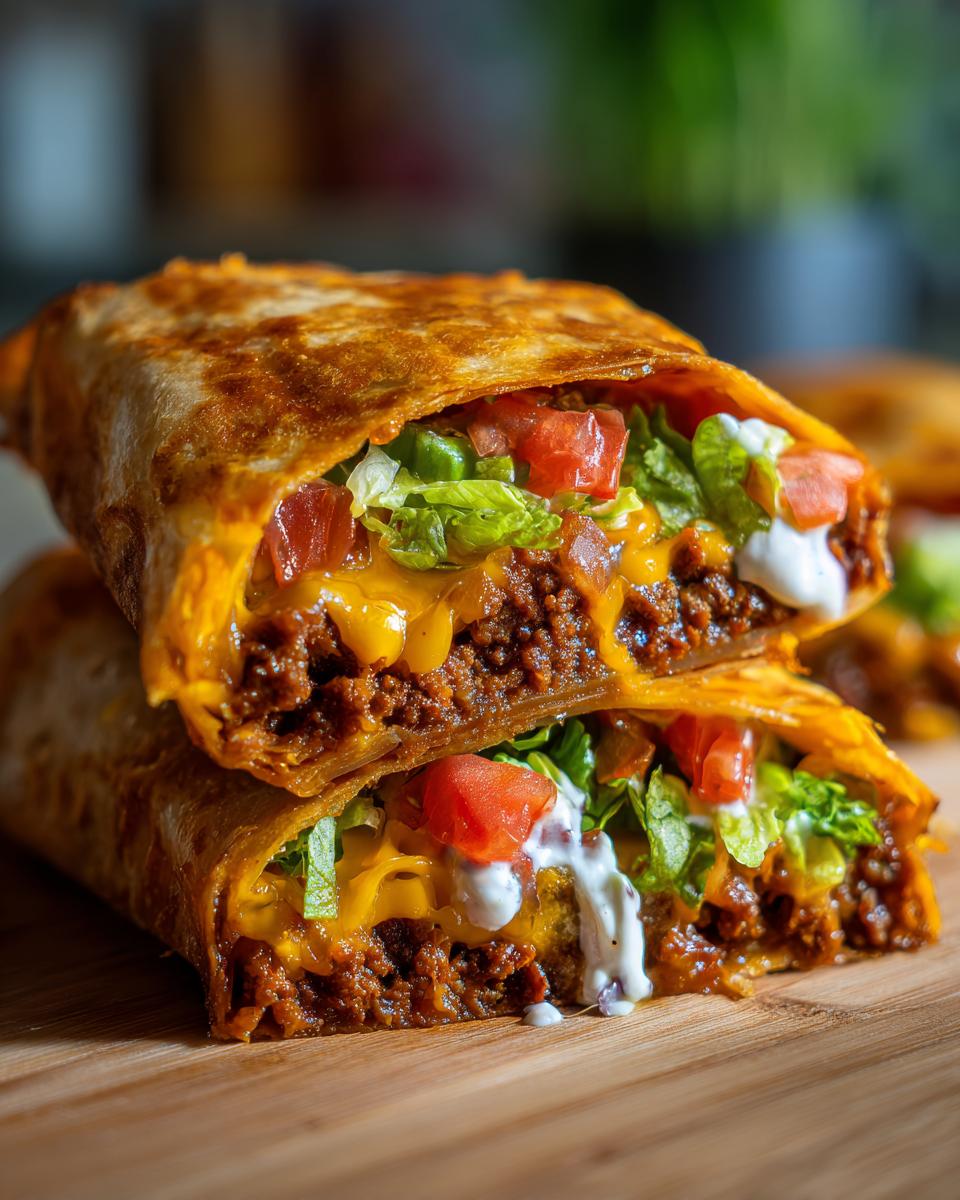
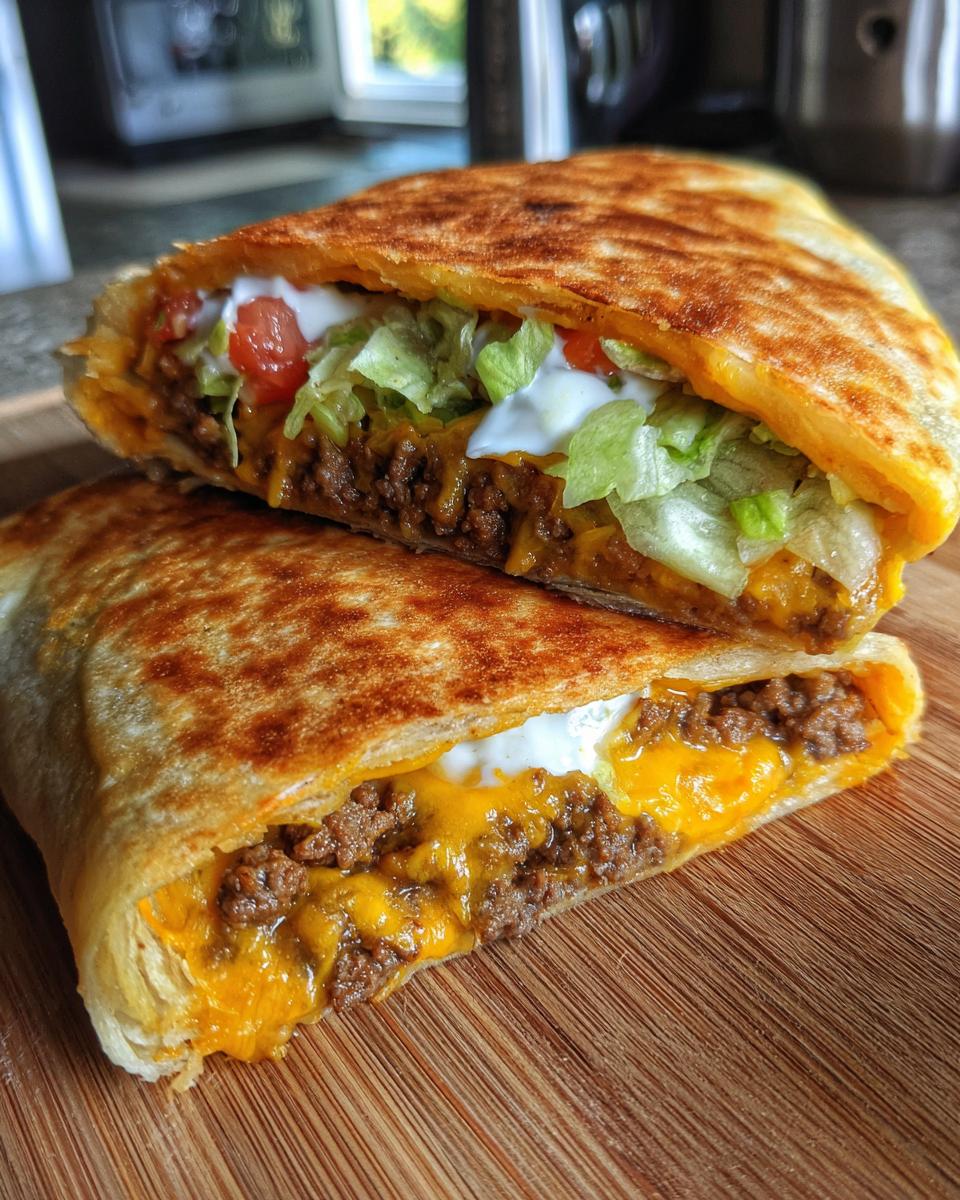
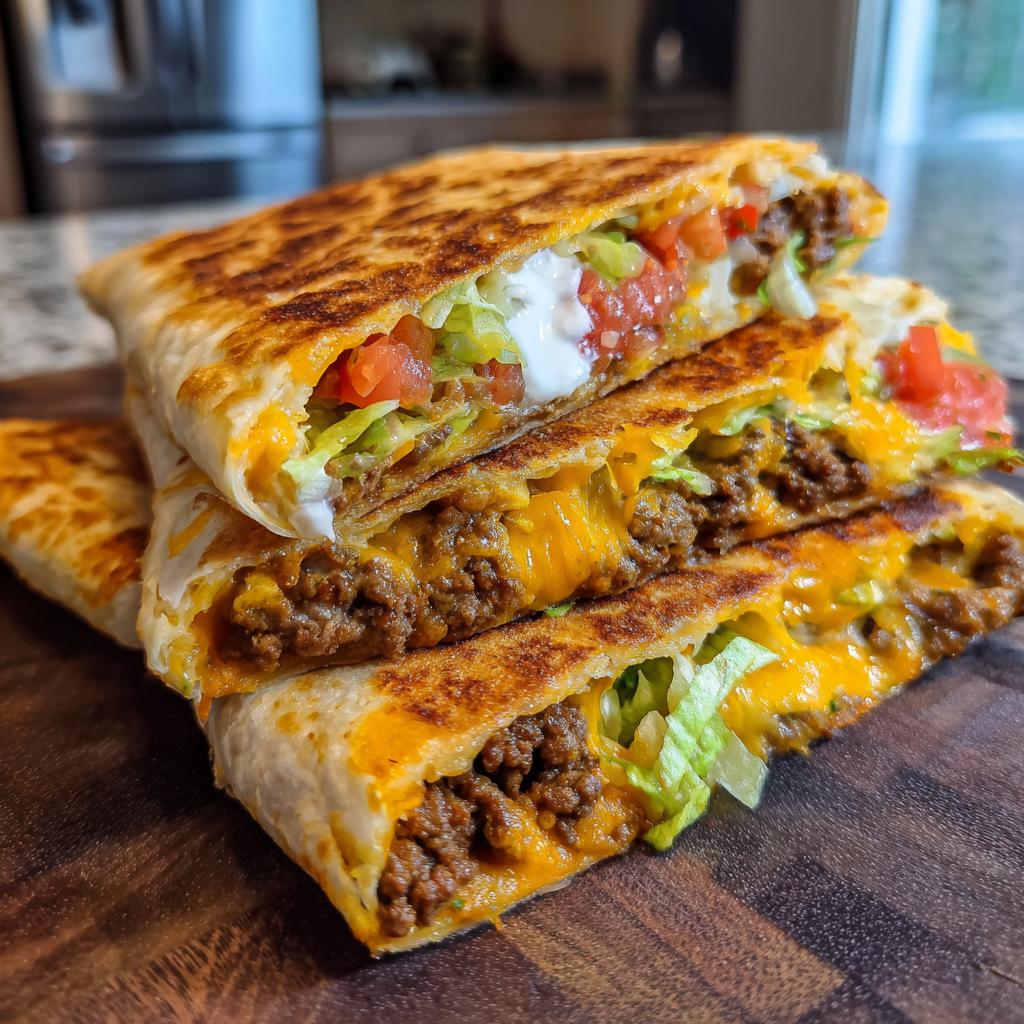
Okay, this is the super fun part! Lay out four of your big flour tortillas on a clean surface. We’re going to build these layer by delicious layer. Spoon a good amount of that seasoned ground beef right into the center of each tortilla. On top of the beef, we’re putting a tostada shell – that’s for the CRUNCH, people! Then, pile on that shredded cheddar cheese, some fresh shredded lettuce, a dollop of sour cream, and a spoonful of salsa. Now, here’s the trick to getting that signature crunchwrap shape: carefully fold the edges of the flour tortilla inwards, tucking and overlapping them to create a sort of round package. Don’t worry if it looks a little messy, that’s part of the charm! For extra security so nothing sneaks out, you can even lay another flour tortilla right on top of the folded-over part, but honestly, just folding the first one works great too. It’s all about getting everything tucked in nice and snug for the next step.
Cook to Golden Brown Perfection
Now for the grand finale – getting that perfect golden brown crunch! Lightly oil a skillet or a griddle and heat it up over medium heat. Carefully place your assembled crunchwraps into the hot skillet, seam-side down. You want to hear that gentle sizzle! Let them cook for about 3 to 5 minutes on each side. You’re looking for that beautiful golden brown color on the tortilla and, of course, cheesy, melty goodness escaping from the seams. Keep an eye on them and flip them gently with your spatula. If one side is browning faster, just adjust the heat a bit. The goal is an evenly cooked, gloriously golden crunchwrap that’s piping hot and ready to be devoured!
Tips for the Best Ground Beef Recipes With Homemade Crunchwraps
You know, it’s the little things that can take a good meal to a *great* meal, and with these crunchwraps, it’s all about keeping it simple but smart. I’ve made a ton of these, and trust me, a couple of tricks up your sleeve makes all the difference. Firstly, don’t skimp on the quality of your ground beef – a little bit of fat really does add flavor! Also, if you’re making a big batch, it’s easier to cook the beef filling ahead of time. Just pop it in the fridge and reheat it gently before you start assembling. And hey, if you’re ever looking for another awesome wrap idea, check out this amazing chipotle ranch chicken burrito; it’s a game changer!
Ingredient Notes and Substitutions for Your Crunchwraps
Alright, let’s talk ingredients! While this recipe is pretty straightforward, I know sometimes you need to make a little tweak here or there, or maybe you just want to know what works best. For the ground beef, I usually grab 80/20 because that little bit of fat brings so much flavor, but if you’re aiming for something a bit lighter, 90/10 works too – you might just want to add a tiny bit more oil when you cook it. And for that crucial crunch, you *could* try using regular crunchy tortilla chips, but tostada shells just give you that perfect thickness and shape. If you can’t find them, don’t sweat it too much, just layer up crumbled up crunchy tortilla chips instead! As for the cheese, cheddar is classic, but feel free to mix in some Monterey Jack or a spicy pepper jack for a little kick. Want to make it vegetarian? Just swap the ground beef for black beans or seasoned lentils – delicious!
Frequently Asked Questions About Homemade Crunchwraps
You know, whenever I make these, people always have so many great questions! It’s totally normal because everyone wants to get them just right. So, let’s dive into some of the most common things you might be wondering about these super fun ground beef crunchwraps.
Can I make crunchwraps ahead of time?
Oh, this is a good one! You *can* prep parts of them ahead of time, which is a lifesaver. Cook your ground beef filling and let it cool completely, then store it in an airtight container in the fridge. You can also chop your lettuce and get your cheese shredded. However, I *highly* recommend assembling and cooking them right before you want to eat them. That way, you get that amazing crispiness from the tostada shell and the perfectly melted cheese without any sogginess. Nobody wants a sad, floppy crunchwrap, right?
What are the best toppings for crunchwraps?
Honestly, this is where you get to go wild! The recipe includes the classics: shredded lettuce, sour cream, and salsa. But I love adding diced tomatoes, some chopped red onion for a little bite, maybe some pickled jalapeños if you’re feeling brave, or even a sprinkle of fresh cilantro. A little bit of avocado or guacamole is also divine! Think about what you love on tacos or burritos, and it’ll probably work wonderfully here.
Are homemade crunchwraps healthy?
That’s a loaded question, isn’t it? Compared to restaurant versions, you have SO much more control! You can use leaner ground beef, load up on fresh veggies, and choose lighter toppings. If you’re watching carbs, you could even try using smaller tortillas or cutting back on the tostada shell, though that crunch is pretty key! Overall, making them at home gives you the power to make them as “healthy” as you want them to be. It’s definitely a more wholesome dinner option when you make it yourself.
How do I keep my crunchwraps from getting soggy?
Okay, this is the million-dollar question for any wrapper-style meal! The biggest thing is to make sure your ground beef filling isn’t too watery; draining the grease well helps a lot with that. Also, don’t overload on the wetter toppings like salsa or sour cream *before* cooking. Assemble and cook them as close to serving time as possible. The tostada shell is your best friend here – it adds that essential layer of crunch that holds up really well. If you’re really worried, you can try toasting the inside of the flour tortilla *very* lightly in a dry pan before assembling, but the cooking process usually takes care of it!
Storing and Reheating Your Delicious Crunchwraps
So, you have some leftover crunchwraps? Lucky you! The best way to store them is to let them cool down completely before wrapping them up. I usually wrap mine individually in foil or plastic wrap, or pop them into an airtight container. This helps keep all that cheesy goodness from leaking out. When it’s time to reheat, I like to use a skillet over medium-low heat, just like we did when we first cooked them, to bring back that awesome crunch. Pop them seam-side down first and let them heat through until nice and golden again. That way, they’re almost as good as when they were fresh!
Nutritional Information (Estimated)
Okay, so when we’re talking about these glorious homemade crunchwraps, it’s good to have a rough idea of what you’re digging into. Keep in mind that these numbers are just estimates, because honestly, who measures *exactly* when they’re making something this fun? The exact counts can totally change depending on the specific brands you use, how much extra cheese you sneak in (because, let’s be real, we all do!), and even how much salsa you dollop on top. But for a general ballpark, you’re looking at something like [Insert Estimated Calories Here] calories, around [Insert Estimated Protein Here]g of protein, [Insert Estimated Fat Here]g of fat, and about [Insert Estimated Carbohydrates Here]g of carbs per crunchwrap. Enjoy!
Homemade Crunchwraps
Ingredients
Equipment
Method
- Brown the ground beef in a large skillet over medium-high heat. Drain off any excess grease.
- Stir in the taco seasoning and water. Cook according to seasoning packet directions, about 2-3 minutes, until the sauce has thickened.
- Lay out four of the large flour tortillas. Spoon the ground beef mixture evenly onto the center of each tortilla.
- Top the beef with a tostada shell, then sprinkle with shredded cheese, lettuce, sour cream, and salsa.
- Fold the sides of the flour tortilla inward to create a round shape, enclosing the filling. The tortilla will overlap itself.
- Place the remaining four flour tortillas on top of the folded crunchwraps, seam-side down. You can also just fold the tortillas without the extra top tortilla.
- Heat a lightly oiled skillet or griddle over medium heat. Place the crunchwraps seam-side down and cook for 3-5 minutes per side, until golden brown and the cheese is melted.
- Serve immediately.