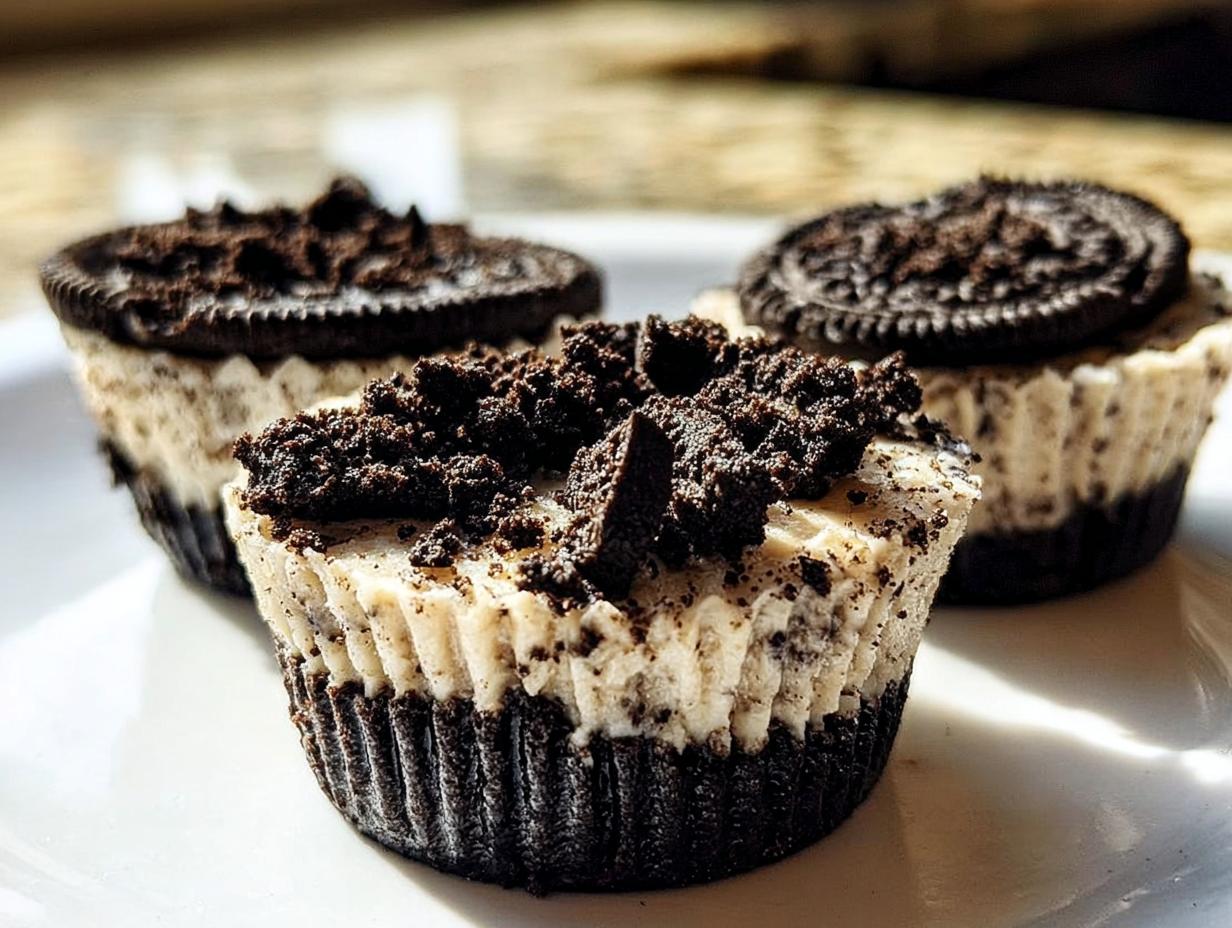
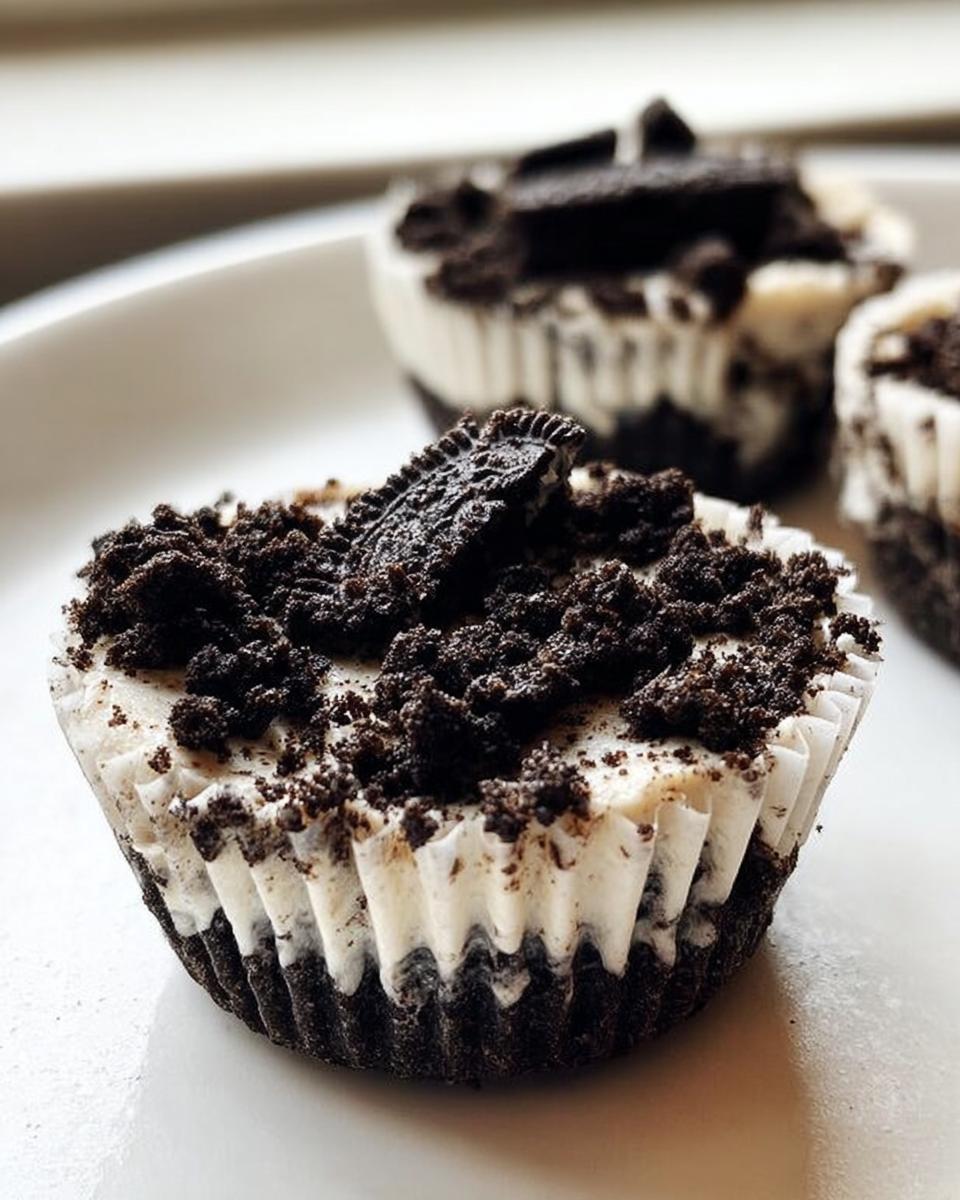
Oh, you know how much I love a good no-bake dessert! They’re just so easy and satisfying, especially when you can get that rich, creamy goodness without even turning on the oven. And let’s be honest, who can resist the magic of Oreos mixed into a cheesecake? That’s why I was absolutely thrilled to develop these Healthy No-Bake Oreo Cheesecake Bites. They hit all the right notes – that classic Oreo flavor you adore, that dreamy cheesecake texture, and best of all, a version that makes you feel good about indulging! I actually whipped these up one sweltering summer weekend when I was hosting a barbecue. I wanted something special for my friends, but definitely something that wouldn’t weigh us down. When these little bites were a smash hit, and everyone was amazed they were a healthier option, I knew I had a winner. It just goes to show, delicious treats *can* be nourishing!
Why You’ll Love These Healthy No-Bake Oreo Cheesecake Bites
Seriously, these little bites are a game-changer! Here’s why you’ll be making them again and again:
- Super EASY to Make: No oven required! Just mix, layer, and chill. Perfect for even beginner bakers.
- Irresistibly Delicious: You get that classic Oreo flavor and creamy cheesecake texture you crave, but with a healthier twist. Trust me, they taste decadent!
- Guilt-Free Indulgence: We’ve dialed down the less-than-healthy stuff so you can enjoy a treat that feels good to eat.
- Perfect for Any Occasion: Whether it’s a party, a potluck, or just a Tuesday night craving, these bites are always a hit.
- Kid-Approved: Even the pickiest eaters will gobble these up – and you’ll feel good about what you’re serving them!
Gather Your Ingredients for Healthy No-Bake Oreo Cheesecake Bites
Okay, so getting these delightful little cheesecake bites ready is a breeze, and it all starts with having the right ingredients on hand. Don’t worry, nothing too fussy here! We’re keeping it simple but oh-so-delicious.
Here’s what you’ll need:
For the Crust:
- 12 Oreos, finely chopped (This gives us that perfect cookie base, trust me!)
- 1/4 cup butter, melted (Just enough to bind those crumbs together.)
For the Filling:
- 7 Oreos, roughly chopped (These add little bursts of Oreo goodness right into the creamy filling.)
- 8 oz cream cheese, softened (Make sure it’s nice and soft so it blends smoothly!)
- 1/2 cup powdered sugar (For that lovely sweetness and silky texture.)
- 1 teaspoon vanilla extract (Adds that classic cheesecake aroma and depth.)
- 1 cup heavy whipping cream (This is what makes it so wonderfully light and fluffy.)
For the Topping:
- 5 Oreos, roughly chopped (Just a little sprinkle to finish them off and make them look extra special!)
Got all that? Wonderful! Having everything prepped and ready makes the whole process smooth sailing.
Step-by-Step Guide to Making Healthy No-Bake Oreo Cheesecake Bites
Alright, time for the fun part! Making these Healthy No-Bake Oreo Cheesecake Bites is easier than you think, and trust me, the result is totally worth it. We’ll go step-by-step, and you’ll see how simple it is to get that perfect, creamy texture with that delightful Oreo crunch. Grab your food processor and let’s get started!
Preparing the Crust for Your Healthy No-Bake Oreo Cheesecake Bites
First things first, we need to get that yummy crust ready. You’ll want to take your 12 Oreos and chop them up really finely in your food processor. Think almost like coarse sand. Once they’re all crumbly, just pour in that melted butter and give it a quick pulse or stir until it’s all combined. Then, line your cupcake tray with those liners – makes for super easy cleanup, which I love! Spoon your Oreo-butter mixture into each liner and press it down nice and firm with the bottom of a spoon or a little measuring cup. This forms our base, so make sure it’s packed well!
Crafting the Creamy Filling
Now for the star of the show – that luscious filling! You’ll want to pop your softened cream cheese into the food processor. Add in the powdered sugar, vanilla extract, and that heavy whipping cream. Let it all whirl until it’s incredibly smooth and fluffy, like a dream. Oh, and don’t forget those roughly chopped 7 Oreos! Give them a gentle stir into the cream cheese mixture by hand. You want those little chunks of Oreo in there for texture and that extra flavor burst.
Assembling and Chilling Your Bites
It’s time to bring it all together! Carefully spoon that gorgeous cream cheese and Oreo filling right on top of your prepared crusts in the cupcake liners. Make sure they’re evenly distributed. Then, artfully sprinkle those last 5 chopped Oreos over the top of each bite. They look so pretty! Now, the hardest part: patience! Pop the whole tray into the refrigerator for at least an hour. This is crucial for them to set up properly and get that perfect cheesecake texture. Honestly, they freeze beautifully too if you want to make a big batch ahead of time! These little bites are also a great make-ahead option that your friends will rave about at parties too. You can find more inspiration for Oreo cheesecake recipes like this on other sites, but I think mine has just the right touch!
Tips for Perfect Healthy No-Bake Oreo Cheesecake Bites
You know, sometimes the “healthy” angle makes people think something won’t taste as good, but trust me, these little bites are proof that you can have your cake (or cheesecake!) and eat it too. To make sure yours turn out absolutely perfect, here are a few little tricks I’ve picked up:
- Cream Cheese Softness is Key! This is probably the MOST important tip. If your cream cheese isn’t fully softened, you’ll end up with lumpy filling. Let it sit on the counter for at least an hour, or even pop it in the microwave for *very* short bursts (like 15 seconds) until it’s soft but not melted.
- Don’t Overmix the Filling: Once you add the heavy whipping cream, you want to mix until it’s just combined and fluffy. Overmixing can make it too runny. We want it thick and creamy, not soupy!
- Press That Crust Down Firmly: The crust is the foundation, so don’t be shy! Make sure it’s packed down well into the liners. This helps prevent the crust from crumbling when you bite into your delicious cheesecake bite.
- Chop Your Oreos Wisely: For the crust, you want them finely chopped so they stick together. For the filling and topping, a rough chop is perfect – you want those little cookie pieces to add texture and surprise!
- Give ‘Em Enough Chill Time: Resist the urge to dig in right away! That hour in the fridge is crucial for them to set up properly. If you’re short on time, you can speed things up a little in the freezer, but the fridge gives the best texture. Making them ahead is honestly the way to go for these! You can find more helpful tips on making delicious desserts like these!
Follow these little pointers, and you’ll have the most amazing Healthy No-Bake Oreo Cheesecake Bites every single time!
Ingredient Notes and Substitutions
Alright, let’s chat about these ingredients for our Healthy No-Bake Oreo Cheesecake Bites! Sometimes a little tweak can make all the difference, or maybe you just don’t have exactly what the recipe calls for. No worries, I’ve got you covered!
The Oreos: These are pretty central, right? For a truly “Oreo” flavor, the classic sandwich cookie is your best bet. However, if you’re looking for a healthier spin or need to go gluten-free, you can totally use gluten-free Oreos or even other chocolate sandwich cookies. For the crust, make sure they’re chopped super fine, almost like dust, for that perfect compact base. For the filling and topping, rough chops are great – you want those little cookie bits!
Cream Cheese & Sweeteners: I find full-fat cream cheese gives the best creamy texture, but light cream cheese works too if you’re really watching calories. Just be aware it might be a tiny bit less rich. As for the powdered sugar, you can try a sugar-free powdered sweetener if you like, just make sure it measures cup-for-cup like regular powdered sugar. And if you’re feeling adventurous, adding a touch more vanilla or even a tiny pinch of almond extract to the filling can be divine! These little gems are a great way to satisfy your sweet tooth, and you can even explore other kinds of healthy bites if you want other no-bake ideas!
Frequently Asked Questions About Healthy No-Bake Oreo Cheesecake Bites
Got questions about these delightful little treats? I get it! Sometimes you just need a little extra guidance. Here are a few things people often ask me:
Can I make these vegan?
While this recipe uses dairy cream cheese and heavy cream, you could definitely try a vegan cream cheese alternative and full-fat coconut cream (the thick part from a chilled can) instead. Just be sure your Oreos are vegan too, as some varieties aren’t!
How long do Healthy No-Bake Oreo Cheesecake Bites last in the fridge?
They usually stay wonderfully fresh in an airtight container in the refrigerator for about 3 to 4 days. I find they’re best enjoyed within the first couple of days for that perfect creamy texture!
Can I use a different type of cookie for the crust?
Absolutely! If you’re not an Oreo fan (gasp!) or want a different flavor, you can totally swap them out. Graham crackers, digestive biscuits, or even vanilla wafers would work great. Just adjust the butter amount slightly if the crumbs seem too dry or too wet. You might want to check out some other creamy dessert ideas if you’re looking for more inspiration!
Can these bites be frozen?
Yes, they freeze really well! Once they’re set, you can pop them into a freezer-safe container with parchment paper between layers. They’ll keep for a couple of months. Just let them thaw in the fridge for an hour or so before you’re ready to enjoy them.
What makes them “healthier” than regular no-bake cheesecake?
It’s all about smart ingredient choices! We use portion control by making them bite-sized, and while Oreos are still Oreos, using fewer of them in the filling and crust, along with lighter cream cheese options and carefully measured sugar, helps make them a more guilt-free indulgence compared to a traditional, very rich cheesecake.
Serving and Storing Your Cheesecake Bites
These little gems are so versatile! For serving, I love to pull them right out of the fridge and let them sit for just a few minutes – they’re perfect when they’re still chilled but not rock hard. They look so cute right in their little liners, but you can also pop them out and arrange them on a pretty platter if you’re feeling fancy. If you’ve got leftovers (which is rare in my house!), just pop them into an airtight container and keep them in the fridge. They’ll stay yummy for about 3-4 days. Honestly, making them ahead is the best – you can check out some make-ahead tips for busy weeks, and these cheesecake bites fit right in!
Nutritional Information
Just a heads-up, the nutritional info for these Healthy No-Bake Oreo Cheesecake Bites is an estimate, as it can totally vary depending on the exact brands of ingredients you use! But generally, you’re looking at about 240 calories per bite. This includes around Xg of fat, Yg of protein, and Zg of carbohydrates. It’s a pretty reasonable trade-off for such a delicious treat!
Share Your Creations!
I absolutely LOVE seeing your baking adventures! If you give these Healthy No-Bake Oreo Cheesecake Bites a try, pretty please share your results. Snap a pic, tag me, or just drop a comment below to let me know how they turned out. Your feedback and photos totally make my day and help inspire other home bakers out there! You can also reach out through my contact page if you have any questions!
Healthy No-Bake Oreo Cheesecake Bites
Ingredients
Equipment
Method
- In a food processor, roughly chop 5 Oreos and set aside for topping.
- In a food processor, roughly chop 7 Oreos and set aside for filling.
- In a food processor, finely chop 12 Oreos and set aside for the crust.
- Melt the butter. Mix the melted butter with the 12 finely chopped Oreos.
- Line a cupcake tray with 12 cupcake liners. Fill each liner with an equal amount of the butter and Oreo mixture. Press down to flatten using a measuring cup or spoon.
- In a food processor, combine the cream cheese, powdered sugar, vanilla extract, and heavy cream. Mix thoroughly until smooth.
- Hand mix in the 7 chopped Oreos into the cream cheese mixture.
- On top of the Oreo crust, fill the 12 cupcake liners with equal amounts of the creamy Oreo mixture.
- Top with the remaining 5 chopped Oreos.
- Refrigerate for 1 hour. These also freeze well.